MachPro Jogging Increments & Pendant Info
{{@2007#bkmrk--1}}
Adjusting Pendant Acceleration
To access the pendant acceleration settings:
- Disable MachPro
- Pull down Configure -> Control
- Select the Settings tab
- Collapse the settings tree

- Expand the Jogging section.


In the MPG section, you can enter values between 1-100. You should test the jogging with the pendant to make sure that it is jogging smoothly on all increments.

Adjusting Jog Increments
To access the pendant jog increment settings:
- Disable MachPro
- Pull down Configure -> Control
- Select the General tab
|
The pendant has three jog increment positions: X100, X10 and X1. The distance the machine will jog at each setting is determined by the values in the bottom 3 fields in both the inches and metric sections.
|
|
This screen sets the values for all jogging increments: inches and metric, pendant and on-screen
Using the values in this example:
If a position has a 0 then it will not be cycled through the jog increments for on-screen jogging.
On some systems, X100 is too fast and only X10 and X1 are needed. In that case set the X100 and X10 values the same 0.001 (inches) or 0.01 (metric).
|
|
To use the different jog increments with on-screen jogging:
|
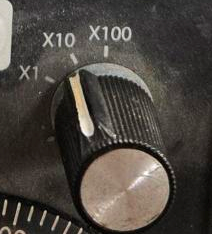


The on-screen Jogging Increments cycles through the entire Jog Increments section positions, while the Pendant X1, X10, and X100 knob settings increments through positions 3, 4, and 5 if units mode is inches (outlined in blue below), and positions 8, 9, and 10 (outlined in green below) if units mode is metric.
The image below has the position numbers entered in as the values for better explanation. Your values would more likely be 1, .100, .01, .001 or 25.4, 2.54, .254 for example.

Note: The pendant will send pulses to the control, and all those pulses will be completed - even if it takes several more seconds. It appears to be coasting, but it is really completing the motion you commanded.
This is more visible on an axis with a low velocity.
X100 is most likely to be a problem. Set it to the same value as X10 to reduce the speed that the pendant sends pulses.
If a position has a 0 then it will not be cycled through the jog increments for on-screen joggingX1, X10, and X100 on pendant is position 5, 4, and 3 in the jog increments setting for inches or 10, 9, and 8 for metric, respectively (X1 is position 5 and 10, X10 is position 4 and 9, and X100 is position 3 and 8). For example, using the photo above:An X1 pendant setting with units setup for inches, would be a commanded move of 5 inches and if setup for metric units would be 10mm.An X100 pendant setting with units setup for inches, would be a commanded move of 3 inches and if setup for metric units would be 8mm.
The settings on this screen will apply to both the pendant and the panel buttons
Note: Standard for centerless grinders is X100 for pendant to be set to the same increment as X10. Often both will be set to 0.0001.
Rotary Increments
- Disable MachPro
- Pull down Configure -> Control
- Select the
ServiceSettingsTabtab - Collapse the
bottomsettingsoftree - Expand the
mainJoggingscreen,section. - Work
clickin theInterfaceRotaryConfigsub-section
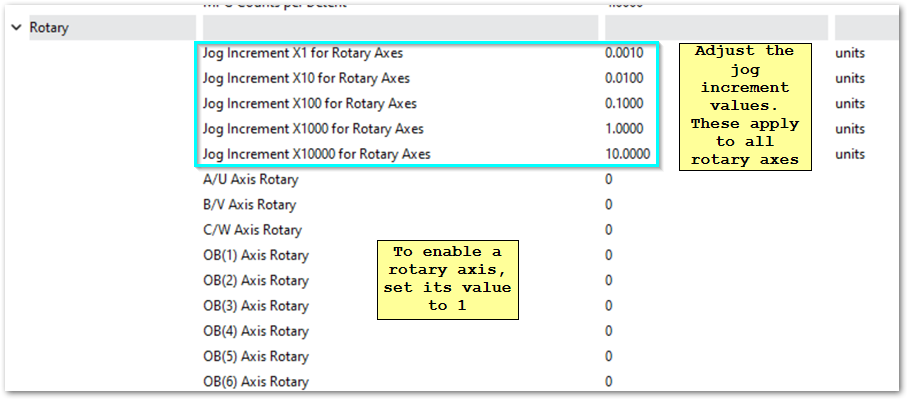
Change the rotary parameter to a 1, then it will use the rotary increments shown highlighted above.
Reverse MPG Pendant Direction
- Wired Pendant:
- In the User Interface tab of the MachPro Plugin, select the wired pendant in the list of active controllers, then set the Invert encoder checkbox (check the box if unchecked, uncheck if checked)
- Wireless Pendant:
- To enable the reverse, you need to add a key to the machine.ini file.
- Under the section for the MPG (eg. [ExternalController#]), add the field:
ReverseEncoder=1 - Note: The ExternalController # will depend on the setup location in the plugin list for the user interfaces.
{{@2016}}