Baserow Explanation
{{@672}}
It may be helpful to have Baserow open to follow along. For getting to Baserow: Accessing Baserow
1. Table Overview
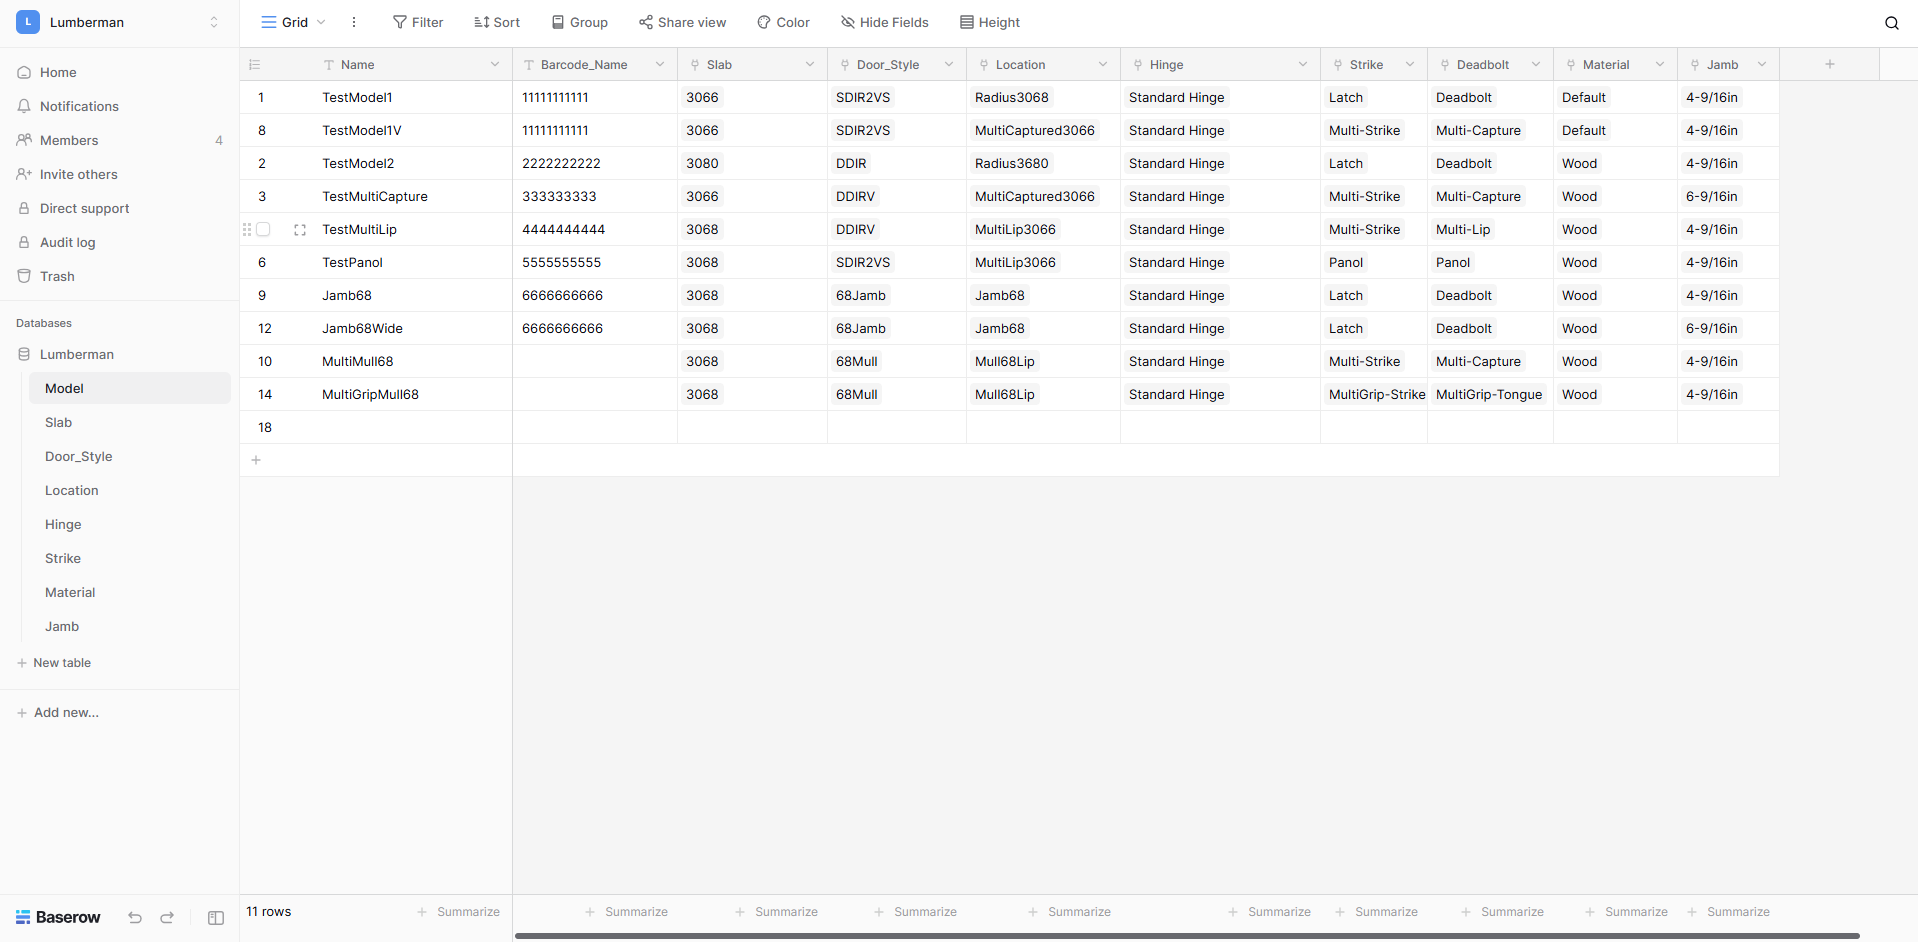
Model
This is where user created door models live. They are viewed/edited/created here. This tables uses the data found in the other tables for a simple model creating process. An explanation for how to make a model can be found here: Creating A Model in Baserow
Slab
Describes door slabs using height and width.
MaterialDoor_Style
FeedDescribes rate data for cutting each typeorientation of material.a door.
Location
Data on where to place hinges/strikes, how many hinges and hinge thickness.
Hinge
Data used to describe a hinge to the gcode creating software.
LockStrike
Data used to describe a lockstrike to the gcode creating software.
LatchMaterial
Feed rate data for cutting each type of material.
Jamb
Data used to describe a latchjamb to the gcode creating software.
Panic
Data used to describe a panic to the gcode creating software.
Hole_Pattern
Repeated hole patterns found in locks to be used in Lock.
2. Table Explanations
In-depth look into the different tables. Describing what each of their columns do.
2.1 Model
Name
Unique identifier for a door model.
Barcode_Name
Optional name for a door model that can be turned into a barcode. This name should follow standard barcode conventions.
Description
Short description describing the door model.
Swing
Option selector for each type of door swing.
LH - Left Hand
RH - Right Hand
RHR - Right Hand Reverse
LHR - Left Hand Reverse
LHI - Left Hand Inactive
RHA - Right Hand Active
RHRA - Right Hand Reverse Active
ERHRI - Egress Right Hand Reverse Inactive
ELHRA - Egress Left Hand Reverse Active
Slab
Which slab to use for a model. Lets you pick from created slabs in Slab.
PanicDoor_Style
Which panicDoor_Style to use for a model. Let'sLets you pick from created panicsstyles in PanicDoor_Style.
Panic_CL
How far the panic device center line will be from the top of the door. Only needed if a panic device is selected.
Location_SetLocation
Which location set to use for a model. Let's you pick from created location sets in Location_SetLocation.
Hinge
Which hinge to use for a model. Let's you pick from created hinges in Hinge.
LockStrike
Which lockstrike to use for a model. Let's you pick from created locksstrikes in LockStrike.
Deadbolt
Which deadbolt to use for a model. Let's you pick from created strikes in Deadbolt.
Material
Which material to use for a model. Let's you pick from created materials in Material.
NotesJamb
AnyWhich notesjamb aboutto use for a modelmodel. canLet's beyou writtenpick here.from created Jambs in Jamb.
2.2 Slab
Slab - The blank piece of wood from which the door is cut out of
Name
Unique identifier for a slab.
Width_NominalNominal_Width
"Pretty" representation of the slabs actual width
Height_NominalNominal_Height
"Pretty" representation of the slabs actual height
Width_ActualActual_Width
Actual width of slab
Height_ActualActual_Height
Actual height of slab
Jamb_Height
Actual height of jamb
Jamb_Width
Actual width of jamb
Mull_Height
Actual height of mull
Header_Width
Actual width of header
2.3 MaterialDoor_Style
Material - What the slab is made out of
Name
Unique identifier for a material.Door_Style.
FeedDoor_Type
DecimalOption betweenselector 0-1 representing a percent factor onfor the feeddoor ratetype.
Single cutting.- Ex:Single .75Door
Double 75- Double Door
Patio- Patio Door
Plunge_FeedSwing
DecimalOption betweenselector 0-1 representing a percent factor onfor the feeddoor rateswing.
Inswing plunging.- Ex:Door .75swings =in
Outswing - Door swings out
Lock_FeedHandedness
DecimalOption betweenselector 0-1 representing a percent factor onfor the feedhandedness rate when cuttingof the lock. Ex: .75 = 75door.
Lock_Plunge_FeedRIght - Door swings in
DecimalLeft between- 0-1Door representingswings a percent factor on the feed rate when plunging the lock. Ex: .75 = 75out
ThicknessFL - Fixed/Left
ThicknessLF of- materialLeft/Fixed
Cut_Spindle_SpeedFR
- Fixed/Right
DecimalRF between- 0-1Right/Fixed
FFL a- percentFixed/Fixed/Left
FLF on- theFixed/Left/Fixed
LFF speed.- Ex:Left/Fixed/Fixed
FFR =- 75Fixed/Fixed/Right
FRF - Fixed/Right/Fixed
RFF - Right/Fixed/Fixed
2.4 Location
Name
Unique identifier for a location set.
Hinge_Size
Height of hinge to be used with location set
Hinge_Backset
Distance of hinge from edge of door
Hinge_Thickness
Distance hinge is cut into door
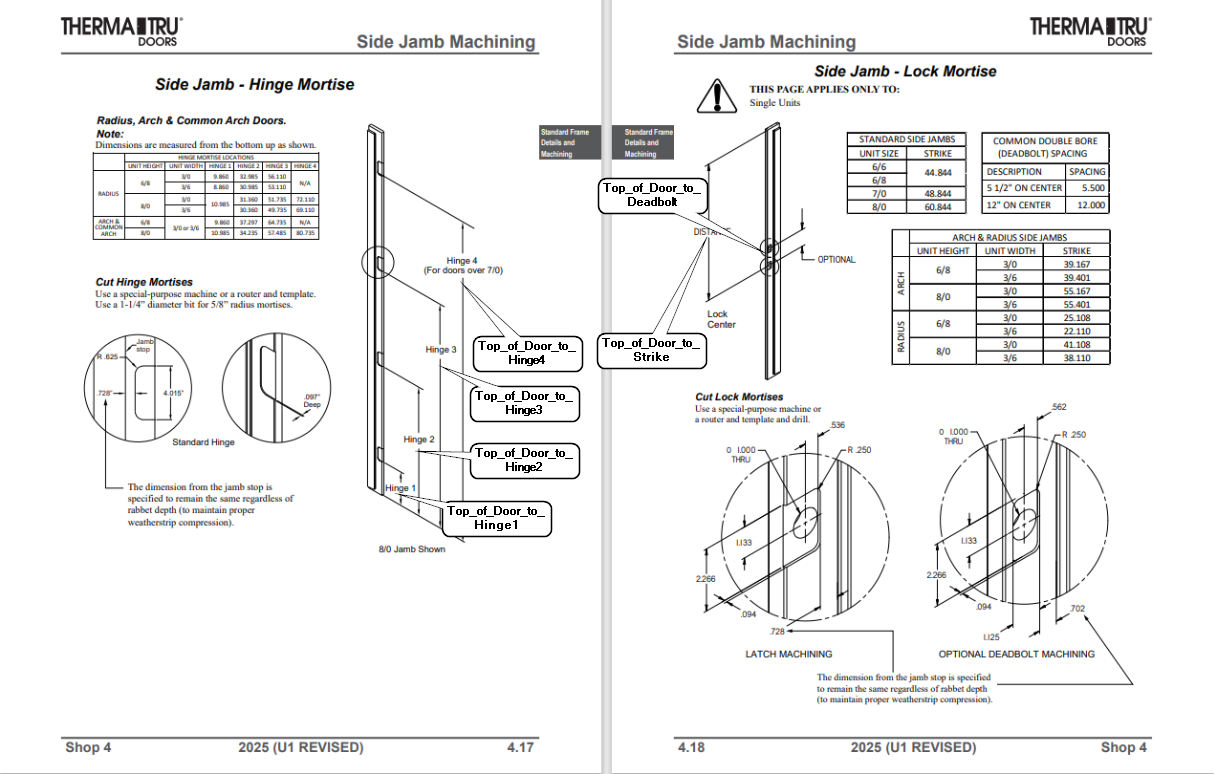
Top_of_Door_to_Hinge_1
Distance from the top of the door to the top of the first hinge
Top_of_Door_To_Hinge_2
Distance from the top of the door to the top of the second hinge
Top_of_Door_To_Hinge_3
Distance from the top of the door to the top of the third hinge
Top_of_Door_To_Hinge_4
Distance from the top of the door to the top of the fourth hinge
Top_of_Door_To_StrikeTop_of_Door_To_Strike_Center
Distance from the top of the door to the middle of the strike
Top_of_Door_To_Deadbolt_Center
Distance from the top of the door to the middle of the deadbolt
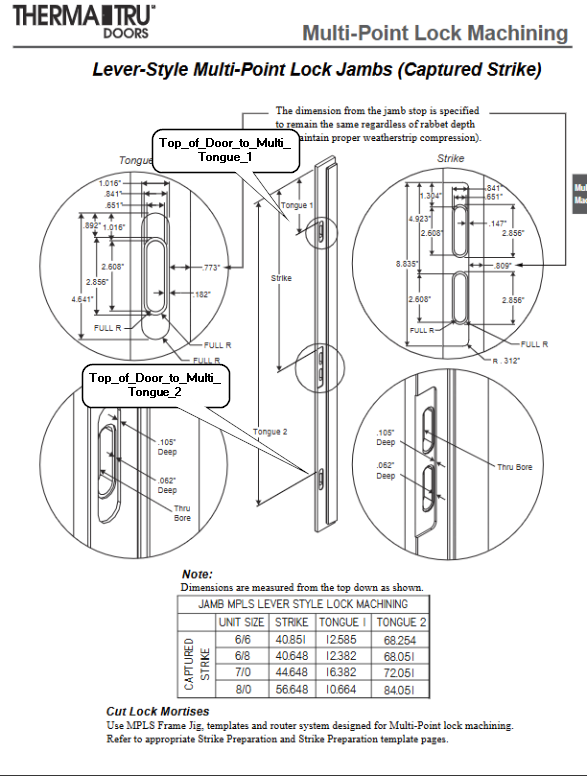
Top_of_Door_to_Multi_Tongue_1
Distance from the top of the door to the middle of the multi point tongue 1
Top_of_Door_to_Multi_Tongue_2
Distance from the top of the door to the middle of the multi point tongue 2
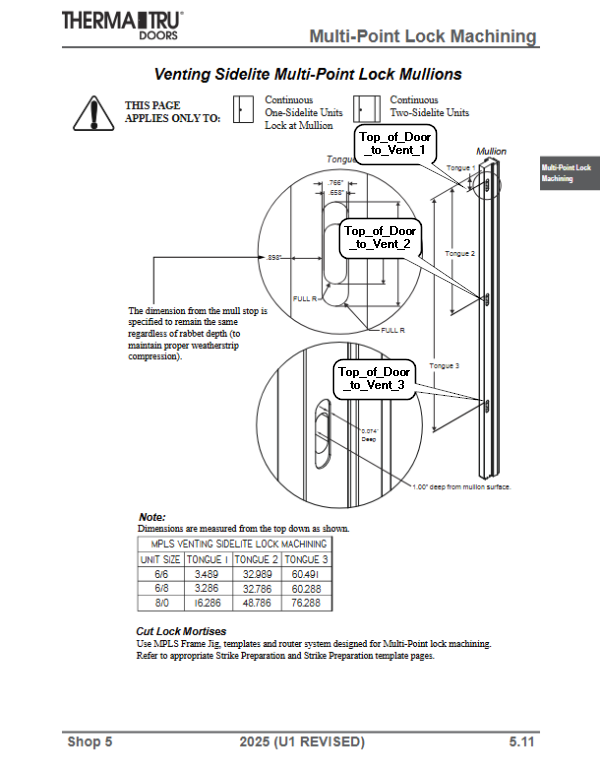
Top_of_Door_to_Vent_1
Distance from the top of the door to the middle of vent 1
Top_of_Door_to_Vent_2
Distance from the top of the door to the middle of vent 2
Top_of_Door_to_Vent_3
Distance from the top of the door to the middle of vent 3
Jamb_Shift
(Not currently used)
Mull_Left
Distance from the left edge of the mull post to the center of the left mull slot
Mull_Right
Distance from the right edge of the mull post to the center of the right mull slot
Mull_Spread
Extra distance in between the two mull slots
Mull_Vent
Distance from the edge to the center of the mull vent slot
2.5 Hinge
Notes:
- X and Y origin is the center of the drawing
- # refers to any given drill or hole column number. EX: Drill_#_X(Drill _1_X, Drill_2_X, Drill_3_X, Drill_4_X)
Name
Unique identifier for a hinge model
GCode
If a gcode file is inserted here, that gcode will be used to cut the hinge instead of using the hinge data found in Hinge table.
Width
Width of hinge (Distance across in Hinge Y-Axis). See image.
Height
Height of hinge (Distance across in Hinge X-Axis). See image.
Corner_Radius
If [Corner_Radius] is 0 then hinge corners are 90°. Otherwise, creates rounded corners with a radius of [Corner_Radius].
Hinge_Depth
How far hinge is cut into jamb in the Z direction.
Hinge_Backset
Offset from jamb backstop to edge of hinge.
Drawing
An image file can be saved here for an easy visual reference for a hinge.
Face
An options select for which side of the door the hinge will be cut on. This should always be "Right" for hinges.
Clearance
An easy way to add "slop" to a hinge. If [Clearance] is 0, hinge will be cut exactly to size specified. If [Clearance] > 0, height and width of hinge will be larger by [Clearance].
Subroutine
If [Subroutine] is any value other than -1, [Subroutine] will be called as a subroutine in gcode to cut hinge instead of using data found in Hinge.
Drill_Type
Option selector for which type of drill command to use. Should always be "99" unless it is known a different drill type should be used.
73 - High Speed Peck
81 - Straight Drilling
83 - Peck Drilling
99 - Retract Drilling
Drill_#_X
X location of # drill inside of hinge. See image
Drill_#_Y
Y location of # drill inside of hinge. See image
Drill_Depth
Distance drill will plunge into door.
Drill_Retract
Distance drill will retract out of material. 0 would be flush with side of door.
Drill_Peck
Distance drill will "Peck" into material if using peck drilling.
Drill_Dia
When Drill_Dia is blank all drills for hinge will be drilled. Otherwise, all drills for a hinge will be bored out with a diameter of [Drill_Dia].
Bore_X#
X location of bore # inside of hinge. See image
Bore_Y#
Y location of bore # inside of hinge. See image
Bore_Depth#
Depth of bore # inside of hinge.
Bore_Dia#
Diameter of bore # inside of hinge. See image
Bore_Step_Down
Distance bore will descend into door during each full revolution of bore.

2.6 LockStrike
Notes:
- X and Y origin is the center of the drawing
- # refers to any given drill or hole column. EX: Drill_#_X(Drill _1_X, Drill_2_X, Drill_3_X, Drill_4_X)
Name
Unique identifier for a lock model.
GCode
If a gcode file is inserted here, that gcode will be used to cut the lock instead of using the lock data found in Lock table.
Lock_CenterDrawing
DistanceAn fromimage edgefile of door to center of lock. See image.
Mill_Both_Sides
Keeps track if it is required that a machinecan be requiredsaved tohere befor ablean toeasy millvisual on both sides of a door to cut a lock.
Latch
Which latch to usereference for a lock. Let's you pick from created latches in Latch.
Latch_GCode
See GCode in Latch.
Latch_Sub
See Subroutine in Latch.
Face
An options select for which side of the door the lock will be cut on. This should always be "Front" for locks.
Clearance
An easy way to add "slop" to a lock. If [Clearance] is 0, lock will be cut exactly to size specified. If [Clearance] > 0, height and width of lock will be larger by [Clearance].
Subroutine
If [Subroutine] is any value other than -1, [Subroutine] will be called as a subroutine in gcode to cut lock instead of using data found in Lock.
DrawingFace_Height
AnHeight imageof filestrike can(Distance beacross savedin hereStrike forY-Axis). anSee easy visual reference for a lock.image.
PatternsFace_Width
LockWidth holeof patternsstrike (Distance across in Strike X-Axis). See image.
Face_Corner_Radius
If [Face_Corner_Radius] is 0 then strike corners are 90°. Otherwise, creates rounded corners with a radius of [Face_Corner_Radius].
Face_Depth
How far strike is cut into the jamb in the Z direction.
Face_Overcut
Tells the gcode software to cut an overhang when cutting a strike.
Strike_Backset
Offset from Hole_Patternjamb canbackstop beto selected.edge of strike.
Hole_X#
X location of hole # inside of lock. See image
Hole_Y#
Y location of hole # inside of lock. See image
Hole_Dia#
If [Hole_Dia#] isn't empty, # hole will be bored with a diameter of [Hole_Dia#]. See image.
Hole_Depth#
Distance hole is cut into door.
Bore_Step_Down
Distance bore will descend into door during each full revolution of bore.
Drill_TypePocket_Width#
Option selector for which typeWidth of drillpocket command to use. Should always be "99" unless it is known a different drill type should be used.
73 - High Speed Peck
81 - Straight Drilling
83 - Peck Drilling
99 - Retract Drilling
Drill_Retract
(Distance drill will retract out of material. 0 would be flush with the door.
Drill_Peck
Distance drill will "Peck" into material if using peck drilling.
Notes
Any notes about a model can be written here.

2.7 Latch
Notes:
X and Y origin is the center of the drawing# refers to any given drill or hole column. EX: Drill_#_X(Drill _1_X, Drill_2_X, Drill_3_X, Drill_4_X)
Name
Unique identifier for a latch model.
GCode
If a gcode file is inserted here, that gcode will be used to cut the latch instead of using the latch data foundacross in thepocket Latch table.
Drawing
An image file can be saved here for an easy visual reference for a latch.
Face
An option select for which side of the door the latch will be cut on. This should always be "Left" for latches.
Clearance
An easy way to add "slop" to a latch. If [Clearance] is 0, latch will be cut exactly to size specified. If [Clearance] > 0, height and width of latch will be larger by [Clearance]X-Axis).
Subroutine
If [Subroutine] is any value other than -1, [Subroutine] will be called as a subroutine in gcode to cut latch instead of using data found in Latch.
Face_HeightPocket_Height#
Height of latchpocket face.(Distance Seeacross imagein pocket Y-Axis).
Face_Width
Width of latch face. See image.
Face_Corner_RadiusPocket_Corner_Radius#
If [Face_Corner_Radius]Pocket_Corner_Radius] is 0 then pocket corners are 90°. Otherwise, creates corners with a radius of entered size for latch face.
Face_Depth
Distance latch face is cut into door. See image.
Bore#_x
X location of bore inside of latch. See image.
Bore#_y
Y location of bore inside of latch. See image.
Bore#_Dia
Diameter of bore inside of latch. See image.
Bore#_Depth
Distance bore plunges into latch.
Bore_Step_Down
Distance bore will descend into door during each full revolution of bore.
Pocket_Width
Width of latch pocket. See image. If blank no pocket will be cut.
Pocket_Height
Height of latch pocket. See image. If blank no pocket will be cut.
Pocket_Corner_Radius
If [Pocket_Corner_Radius] is 0 then corners are 90°. Otherwise, createsrounded corners with a radius of entered size for latch pocket.[Pocket_Corner_Radius].
Pocket_DepthPocket_Width_Depth#
DistanceHow far pocket face is cut into door.the Seejamb image.in the Z direction.
Pocket_Step_Down
Distance pocket will descend into door during each full revolution of pocket.

2.7 Material
Material - What the slab is made out of
Name
Unique identifier for a material.
Feed
Decimal between 0-1 representing a percent factor on the feed rate when cutting. Ex: .75 = 75
Plunge_Feed
Decimal between 0-1 representing a percent factor on the feed rate when plunging. Ex: .75 = 75
Lock_Feed
Decimal between 0-1 representing a percent factor on the feed rate when cutting the lock. Ex: .75 = 75
Lock_Plunge_Feed
Decimal between 0-1 representing a percent factor on the feed rate when plunging the lock. Ex: .75 = 75
Thickness
Thickness of material
Cut_Spindle_Speed
Decimal between 0-1 representing a percent factor on the spindle speed. Ex: .75 = 75
2.8 PanicJamb
Name
Unique identifier for a panic model.Jamb.
GCodeJamb_Depth_Actual
ADepth gcodeof file is inserted here to be used in gcode creating process.jamb.
BacksetMull_Depth_Actual
Distance from sideDepth of door to center of panic device.mull.
DrawingJamb_Rabbet_Actual
AnDepth imageof filejamb can be saved here for an easy visual reference for a panic device.rabbet.
FaceMULL_Rabbet_Actual
An options select for which sideDepth of themull door the panic will be cut on. This should always be "Front" for panic devices.
Subroutine
If [Subroutine] is any value other than -1, [Subroutine] will be called as a subroutine in gcode to cut a panic device instead of using GCode found in Panic.
2.9 Hole_Pattern
Notes:
X and Y origin is the center of the drawing# refers to any given drill or hole column. EX: Drill_#_X(Drill _1_X, Drill_2_X, Drill_3_X, Drill_4_X)
Name
Unique identifier for a hole pattern.
Hole_#X
X location of a hole inside of a pattern. See image.
Hole_#Y
Y location of a hole inside of a pattern. See image.
Hole_#Dia
Diameter of a hole inside of a pattern. See image.
Hole_#Depth
Distance bore plunges into door.
Notes
Any notes about a model can be written here.
