2000 Series Universal Cylindrical Grinder Operating Manual
{{@672}}
Introduction
The 2000 Series Universal Cylindrical Grinder control is a two-axis CNC system for OD/ID grinders.
The system includes standard dressing and grinding macros for common straight, tapered and profile geometries with a more simplified G code program. With its familiar windows interface, intuitive graphics, and user friendly layout, the system is easy to learn. Allowing you to have the machine operational almost immediately
The control also accepts standard Fanuc standard G-code, as well as Fanuc Macro B programming compatibility, giving operators virtually unlimited capabilities for writing their own custom programs and macros.
This manual gives the process for basic operation of the 2000 Series Cylindrical Grinder control including a summary of the different features of the tabs and additional screens.
To open the control software double-click on the profile icon on the desktop.
Screen Navigation
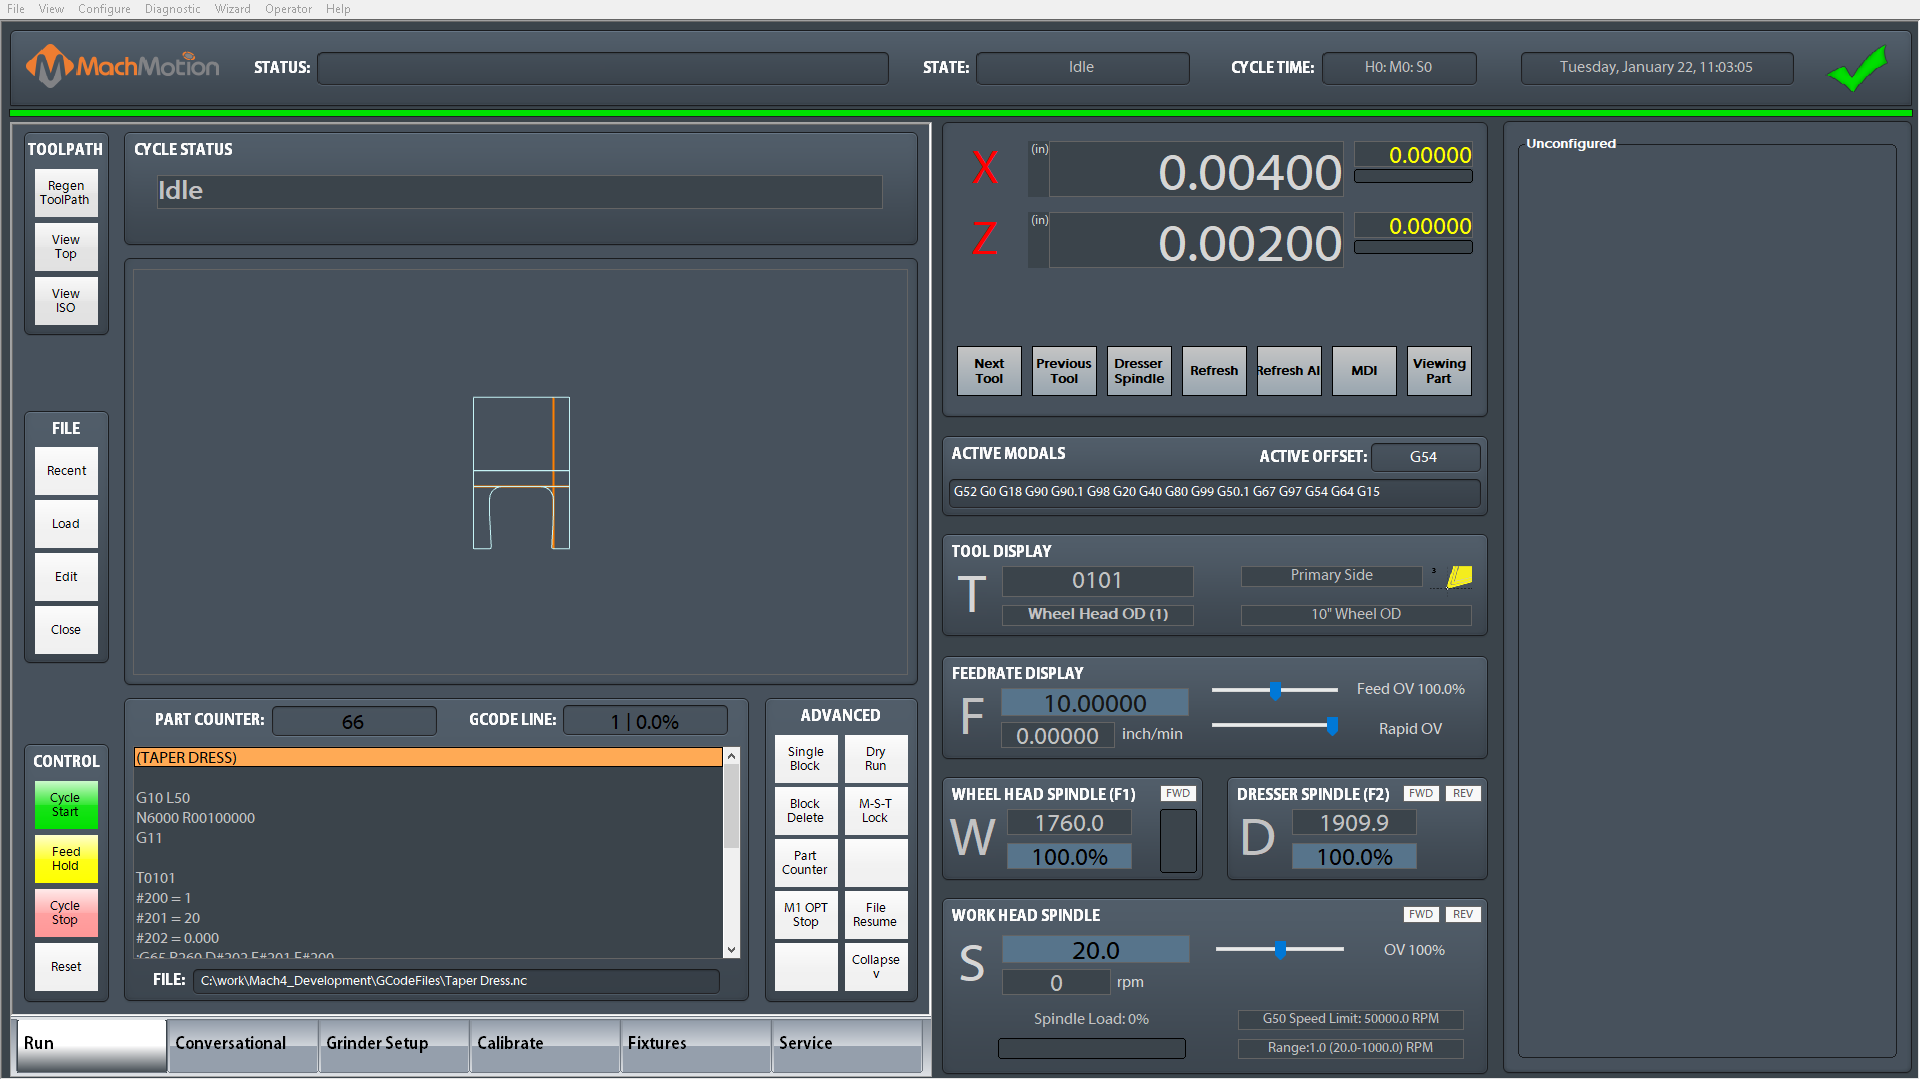
Run Page
The run page contains the necessary features for operating the machine. The left side of the screen contains buttons for loading, editing, and running programs as well as the live tool path window to see the path the machine will take when the program is run.
The center of the screen contains information about machine status. The feedrate, wheel head RPM, and workhead spindle RPM can be modified on the fly by typing a new value in the blue box.
On the right side of the screen is a dashboard that can be configured with any number of widgets based on the operator's preferences (See the Series 2000 User Manual). Seen in the example above is the tool wear offset input window which can be used to make slight adjustments to the part diameter, the part offset table (Part Correction Offset) which, when multiple features are being ground on the part, can be used in conjunction with an "E" variable in the program to allow adjustments to each feature individually.
Conversational Page
The conversational screen is used to quickly and easily create new grinding and dressing programs without manually writing gcode. A program consists of a set of cycles that are included in the job. The cycles can be added to the job in any order and rearranged or removed as needed. Adding a cycle is a matter of selecting the type of cycle, inputting the dimensional data, and pressing Add to Job. Once all cycles are correct, the Post button will load the job for running.

Grinder Setup
The grinder setup screen is used to set up the grinding wheels, dresser options, and safety clearances.
Wheel Head Setup
This page is for setting up wheel head parameters for the active wheel. These parameters affect how the cycles run and how the wheel is dressed.

Dresser Setup
This page is for setting up the dresser diamonds on the machine. There are three types of diamonds supported here:
- Profile dresser: used for dressing circumference and or one side of wheel, as well as user developed wheel profiles.
- Universal dressers: two dressers are used for dressing forms that exceed 90 degrees of travel into or around the wheel that cannot be done with a single dresser. For example, a full radius dressed into or onto the circumference of the wheel, or radii or profiles on both corners of the wheel.
- Straight dressers: used for straight dressing of all three surfaces of the wheel.

Safety Clearances
This page sets the distances between wheel, part, and diamond that are considered safe. These should be configured before running parts or dressing a wheel.

Rotary Dresser
If the machine has a rotary dresser, it's parameters are set on this page.

Calibrate
The calibrate screen is used for calibrating the grinding wheel to the part and adjusting the part size. The axes are brought into position, touching the part, and taught that position. The part is then measured at that position, and the position is updated to adjust for any discrepancy.

Fixtures
The fixtures screen is used for setting fixture, machine, and or work offsets.

Service
The service screen gives access to machine settings and diagnostics. It also contains a second configurable dashboard that can be setup to user preferences.
Maintenance
The service screen is used for control set up, diagnostics, and getting remote help from the support team.

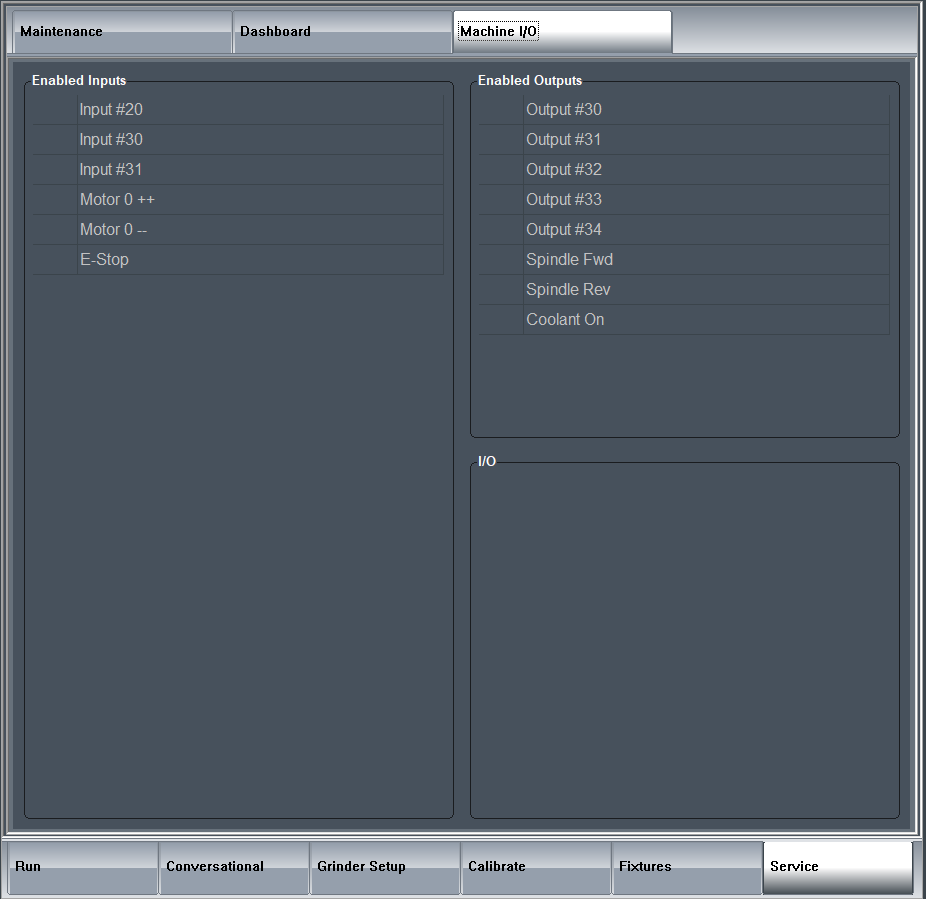
Machine I/O
This page allows the operator to see the state of all configured signals and I/O that are in use on the machine.
Operations
Before Running A Part
Before running parts on the control, be sure the following steps have happened after starting the control software:
- Machine is homed
- Wheel is loaded and calibrated
- Dresser diamond positions have been taught
- Safety clearance positions have been taught
- Centerline of part is correct
Calibrating a Wheel
- Navigate to the Calibrate tab
- Select the tool number near the bottom of the screen to save the settings to
- Mount the wheel in the machine
- Navigate to the Grinder Setup - Wheel Head Setup page
- Fill in all known wheel data
- Dress the wheel
- Navigate to the Calibrate tab
- Touch Z axis to a shoulder of a part and press Teach Z
- Enter the desired Z position in the Measured Z field and press Update
- Touch X axis to the part and press Teach X
- Measure the X axis at that position and enter the value into Measured X and press Update
Use the X Correction and Z Correction fields to adjust the part positions by distance values and pressing Update
Adding a New Dresser
Loading a Job to Run
Creating a New Conversational Job
- Navigate to the Conversational page
- Press the icon for a new file, near the top left corner

- Add cycles to the job
- Press the Post button near the bottom left corner to save and load the job for execution

Loading a Conversational Job for Edit
- Navigate to the Conversational page
- Press the icon for load file, near the top left corner

- Use the File Navigator window to select the job for edit
The file extension must be .ini
The job file must have been previously created by the conversational page
- Double-click on cycles to edit them or add more cycles to the job
- Press the Post button near the bottom left corner to save and load the job for execution

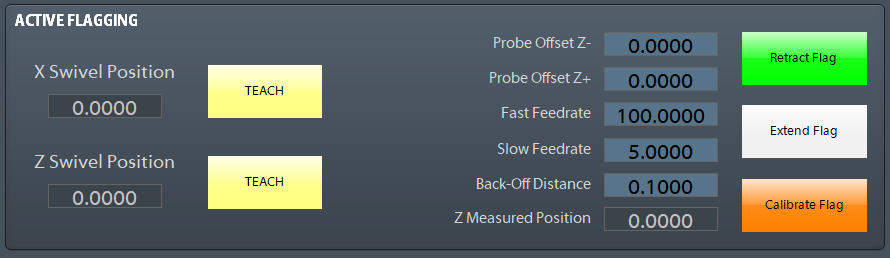
Configuring Flagging Device
The Probe offsets Z+- are used to shift the probe position +- based on the probe move direction.
Grinding Cycles
Dressing Cycles
Positioning to Dress
When a dressing cycle is called the machine will always follow the following path from the part to the dresser, in order to avoid collisions with the part and the diamond.

G251: Dress Taper Face 1, Left
The G251 cycle dresses a taper on the left face. It can increment in on just the X axis, just the Z axis, or on both axes.
The size of the phase height, relief height, and relief angle are all set on the Wheel Head Setup page.
Parameters:
-
- D: The infeed increment to remove from the wheel on each pass.
- E: The number of passes to make across the wheel.
- F: The feedrate to use while dressing wheel.
- I: The height of the taper to put on the wheel (X direction).
- J: The angle of the taper to put on the wheel.
- K: The length of the taper to put on the wheel (Z direction).
- [M]: Passing in a 1 to the M parameter will force dressing. If the parameter is not given and the number of parts per dressing has not been met, then dressing will be skipped.
- [R]: Passing in a 1 to the R parameter will skip setting tool offsets and wheel sizes.
- [Q]: Selects the compensation direction used during the dressing cycles. By default, the compensation is only in the X direction, changing the diameter of the wheel. If a 1 is passed to the Q parameter, then compensation will be in the Z direction, narrowing the wheel. If a 2 is passed to the Q parameter, then compensation will be in the X and Z directions, changing the diameter and narrowing the wheel.
Only two of the parameters I, J, K are required.

Example:
G00 G40 G54 G64 G80 G90.1 G98 G18 G20	(Safe Start Line)
T0101 									(Call wheel type)
G251 D0.0003 F10 E4 I1.0 J45.0			(Wheel Dress)
M30                                     (End program)
%                                       (EOB)
G252: Dress Taper Face 2, Right
The G252 cycle dresses a taper on the right face. It can increment in on just the X axis, just the Z axis, or on both axes.
{{@686#bkmrk-the-size-of-the-phas}}
Parameters:
{{@686#bkmrk-d%3A-the-infeed-increm}}
{{@686#bkmrk-only-two-of-the-para}}

Example:
G00 G40 G54 G64 G80 G90.1 G98 G18 G20	(Safe Start Line)
T0101 									(Call wheel type)
G252 D0.0003 F10 E4 I1.0 J45.0			(Wheel Dress)
M30                                     (End program)
%                                       (EOB)
G253: Dress Circumference and Taper Face 1, Left
The G253 cycle dresses the circumference of the wheel and puts a taper on the left face. It can increment in on just the X axis, just the Z axis, or on both axes.
{{@686#bkmrk-the-size-of-the-phas}}
Parameters:
{{@686#bkmrk-d%3A-the-infeed-increm}}
{{@686#bkmrk-only-two-of-the-para}}

Example:
G00 G40 G54 G64 G80 G90.1 G98 G18 G20	(Safe Start Line)
T0101 									(Call wheel type)
G253 D0.0003 F10 E4 I1.0 J45.0			(Wheel Dress)
M30                                     (End program)
%                                       (EOB)
G254: Dress Circumference and Taper Face 2, Right
The G254 cycle dresses the circumference of the wheel and puts a taper on the right face. It can increment in on just the X axis, just the Z axis, or on both axes.
{{@686#bkmrk-the-size-of-the-phas}}
Parameters:
{{@686#bkmrk-d%3A-the-infeed-increm}}
{{@686#bkmrk-only-two-of-the-para}}

Example:
G00 G40 G54 G64 G80 G90.1 G98 G18 G20	(Safe Start Line)
T0101 									(Call wheel type)
G254 D0.0003 F10 E4 I1.0 J45.0			(Wheel Dress)
M30                                     (End program)
%                                       (EOB)
G255: Dress Circumference, Taper, Face 1 and Face 2
The G255 cycle dresses the circumference of the wheel and puts a taper on both faces. It can increment in on just the X axis, just the Z axis, or on both axes.
{{@686#bkmrk-the-size-of-the-phas}}
Parameters:
{{@686#bkmrk-d%3A-the-infeed-increm}}
{{@686#bkmrk-only-two-of-the-para}}

Example:
G00 G40 G54 G64 G80 G90.1 G98 G18 G20	(Safe Start Line)
T0101 									(Call wheel type)
G255 D0.0003 F10 E4 I1.0 J45.0			(Wheel Dress)
M30                                     (End program)
%                                       (EOB)
G260: Dress Circumference
The G260 cycle dresses along the circumference of the wheel, feeding in on the X axis towards the center of the wheel.
Parameters:
-
- D: The infeed increment to remove from the wheel on each pass.
- E: The number of passes to make across the wheel.
- F: The feedrate to use while dressing wheel.
- [M]: Passing in a 1 to the M parameter will force dressing. If the parameter is not given and the number of parts per dressing has not been met, then dressing will be skipped.
- [R]: Passing in a 1 to the R parameter will skip setting tool offsets and wheel sizes.

Example:
G00 G40 G54 G64 G80 G90.1 G98 G18 G20	(Safe Start Line)
T0101 									(Call wheel type)
G260 D0.0003 F10 E4 					(Wheel Dress)
M30                                     (End program)
%                                       (EOB)
G261: Dress Face 1, Left
The G261 cycle dresses along the left face of the wheel, feeding in on the Z axis towards the center of the wheel.
{{@686#bkmrk-the-size-of-the-phas}}
Parameters:
{{@686#bkmrk-d%3A-infeed-per-pass-f}}

Example:
G00 G40 G54 G64 G80 G90.1 G98 G18 G20	(Safe Start Line)
T0101 									(Call wheel type)
G261 D0.0003 F10 E4 					(Wheel Dress)
M30                                     (End program)
%                                       (EOB)
G262: Dress Face 2, Right
The G262 cycle dresses along the right face of the wheel, feeding in on the Z axis towards the center of the wheel.
{{@686#bkmrk-the-size-of-the-phas}}
Parameters:
{{@686#bkmrk-d%3A-infeed-per-pass-f}}

Example:
G00 G40 G54 G64 G80 G90.1 G98 G18 G20	(Safe Start Line)
T0101 									(Call wheel type)
G262 D0.0003 F10 E4 					(Wheel Dress)
M30                                     (End program)
%                                       (EOB)
G263: Dress Circumference and Face 1, Left
The G263 dressing cycle dresses along the circumference of the wheel and the left face. It can increment in on just the X axis, just the Z axis, or on both axes.
The size of the corner radius, phase height, relief height, and relief angle are all set on the Wheel Head Setup page.
Parameters:
-
- D: The infeed increment to remove from the wheel on each pass.
- F: The feedrate to use while dressing wheel.
- E: The number of passes to make across the wheel.
- [M]: Passing in a 1 to the M parameter will force dressing. If the parameter is not given and the number of parts per dressing has not been met, then dressing will be skipped.
- [R]: Passing in a 1 to the R parameter will skip setting tool offsets and wheel sizes.
- [Q]: Selects the compensation direction used during the dressing cycles. By default, the compensation is only in the X direction, changing the diameter of the wheel. If a 1 is passed to the Q parameter, then compensation will be in the Z direction, narrowing the wheel. If a 2 is passed to the Q parameter, then compensation will be in the X and Z directions, changing the diameter and narrowing the wheel.

Example:
G00 G40 G54 G64 G80 G90.1 G98 G18 G20	(Safe Start Line)
T0101 									(Call wheel type)
G263 D0.0003 F10 E4 					(Wheel Dress)
M30                                     (End program)
%                                       (EOB)
G264: Dress Circumference and Face 2, Right
The G264 dressing cycle dresses along the circumference of the wheel and the right face. It can increment in on just the X axis, just the Z axis, or on both axes.
{{@686#bkmrk-the-size-of-the-corn}}
Parameters:
{{@686#bkmrk-d%3A-the-infeed-increm}}

Example:
G00 G40 G54 G64 G80 G90.1 G98 G18 G20	(Safe Start Line)
T0101 									(Call wheel type)
G264 D0.0003 F10 E4 					(Wheel Dress)
M30                                     (End program)
%                                       (EOB)
G266: Roll (Crush) Dressing
The G266 roll dressing cycle brings the wheel to the start position and then increments into the diamond by set amounts. Between each infeed, there is an optional dwell time.
Parameters:
-
- D: Infeed increment amount to feed into the wheel on each pass
- E: The number of passes to make across the wheel.
- F: The feedrate to dress at while feeding into the diamond.
- [H]: The amount of time to dwell between each infeed, in seconds. Defaults to 0.
- [M]: Dressing may be skipped if the number of parts made since last dress has not met the required number. In order to force dressing, pass in a 1 to the M parameter.
- [R]: Passing in a 1 to the R parameter will stop the dressing cycle from updating offsets or wheel size during dressing.

Example:
G00 G40 G54 G64 G80 G90.1 G98 G18 G20	(Safe Start Line)
T0101 									(Call wheel type)
G266 D0.0003 F10 E2 					(Wheel Dress)
M30                                     (End program)
%                                       (EOB)
G269: Profile Dressing
The G269 profile dressing cycle runs a profile routine written by an operator. It will increment in a given number of times and repeatedly run the same profile.
Parameters:
-
- D: Infeed increment amount to feed into the wheel on each pass.
- E: The number of passes to make across the wheel.
- F: The feedrate to dress at while feeding into the diamond.
- P: The program number to run to cut the profile.
- [M]: Passing in a 1 to the M parameter will force dressing. If the parameter is not given and the number of parts per dressing has not been met, then dressing will be skipped.
- [R]: Passing in a 1 to the R parameter will skip setting tool offsets and wheel sizes.
- [Q]: Selects the compensation direction used during the dressing cycles. By default, the compensation is only in the X direction, changing the diameter of the wheel. If a 1 is passed to the Q parameter, then compensation will be in the Z direction, narrowing the wheel. If a 2 is passed to the Q parameter, then compensation will be in the X and Z directions, changing the diameter and narrowing the wheel.
Grinding Cycles
G200: Rapid to Safety Positions
G200 commands a return to the safety positions. The safety positions are configured machine coordinates that can be set on safety page.
Parameters:
-
-
E: Safety position selection
- E1: Part safety position
- E2: Dresser safety position
-
E: Safety position selection
Example:
G00 G40 G54 G64 G80 G90.1 G98 G18 G18 G20		(Safe Start Line)
T0101											(Call wheel type)
G200 E1											(Move to safety positions)
M3 S100                              			(Workhead on CW @ 100 RPM)
G271 X2.050 Z0.000 F10.000 H1.000				(Swing Position 1 Definition, Left)
G272 R3.000 F20.000 H2.000						(Swing Position 2 Definition, Right)
G288 											(Handwheel Infeed Cycle)
G200 E1											(Move to part safety position)
M30												(Program Rewind)
%												(EOB)
G271: Approach Swing Position 1, Left
G271 and G272 collectively define a section of the work piece for grinding. They define the swing positions, swing feedrates, and dwell times to be used for any applicable cycles that are called in the program afterwards. Both G271 and G272 must be called in the program before the following cycles can be used:
Parameters:
-
- X: The starting diameter, in part coordinates, for all applicable cycles.
- Z: The left swing position in part coordinates of the section being defined.
- [E]: The Part Correction Offset number (0-99). Applies a correction to X and Z axes. This is used to make small corrections to the different diameters or shoulders on the part.
- F: The feedrate used while feeding towards swing position 2 (right).
- [H]: The time, in seconds, the machine will dwell after reaching the defined position. If unspecified, the value will default to 0.
- [W]: Z offset

Example:
G00 G40 G54 G64 G80 G90.1 G98 G18 G18 G20		(Safe Start Line)
T0101											(Call wheel type)
G200 E1											(Move to safety positions)
M3 S100                              			(Workhead on CW @ 100 RPM)
G271 X2.050 Z0.000 F10.000 H1.000				(Swing Position 1 Definition, Left)
G272 R3.000 F20.000 H2.000						(Swing Position 2 Definition, Right)
G288 											(Handwheel Infeed Cycle)
G200 E1											(Move to safety positions)
M30												(Program Rewind)
%												(EOB)
If either G271 or G272 are not specified in the program before the applicable cycles, the machine will enter an alarm state and the program will be stopped.
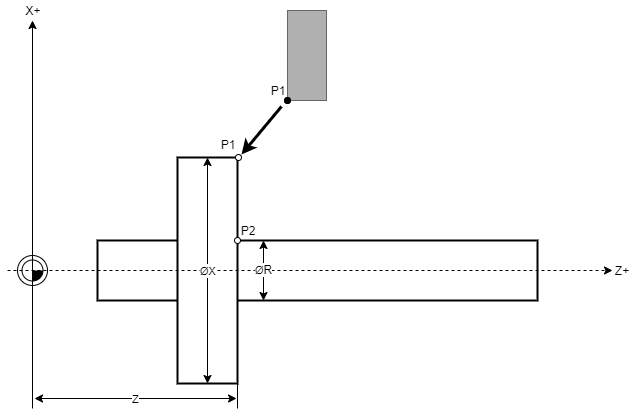
G272: Approach Swing Position 2, Right
{{@686#bkmrk-g271-and-g272-collec}}
Parameters:
-
- R: The distance between the P1 and P2 positions. This value must be greater than the wheel width.
- F: The feedrate used while feeding towards the defined position.
- [H]: The time, in seconds, the machine will dwell after reaching the defined position. If unspecified, the value will default to 0.

Example:
G00 G40 G54 G64 G80 G90.1 G98 G18 G18 G20		(Safe Start Line)
T0101											(Call wheel type)
G200 E1											(Move to safety positions)
M3 S100                              			(Workhead on CW @ 100 RPM)
G271 X2.050 Z0.000 F10.000 H1.000				(Swing Position 1 Definition, Left)
G272 R3.000 F20.000 H2.000						(Swing Position 2 Definition, Right)
G288 											(Handwheel Infeed Cycle)
G200 E1											(Move to safety positions)
M30												(Program Rewind)
%												(EOB)
If either G271 or G272 are not specified in the program before the applicable cycles, the machine will enter an alarm state and the program will be stopped.
G273: Approach Oscillating Position
G273 is used in conjunction with G283 for grinding narrower features. When Invoked, the wheel will rapid to the X and Z start positions and set the oscillation stroke, which is the distance specified in parameter "D". The Z oscillation will move from the start position to the end position in the positive direction.
Parameters:
- X: X start position
- Z: Z start position
- D: Oscillation stroke distance
- [E]: The Part Correction Offset number (0-99). Applies a correction to X and Z axes. This is used to make small corrections to the different diameters or shoulders on the part.
- [F]: Traverse feedrate
- [H]: Number of spark passes
Example:
G00 G40 G54 G64 G80 G90.1 G98 G18 G18 G20		(Safe Start Line)
T0101											(Call wheel type)
G200 E1											(Move to safety positions)
M3 S100                              			(Workhead on CW @ 100 RPM)
G273 X2.050 Z-2.000 D1.000						(Oscillation Position Definition)
G283 X2.000 D0.005 F0.100 H1.000				(Continuous Infeed Cycle)
G200 E1											(Move to safety positions)
M30												(Program Rewind)
%												(EOB)
G274: Multiple Plunge Grind
G274 does a set of plunge grinds between the positions defined in G271 and G272, moving the wheel over by a percentage of the wheel width for each plunge. The plunge amount is the diameter defined by the finish diameter plus the allowance amount. Each plunge can have a dwell at the bottom for a specified number of seconds.
Parameters:
-
- X: The final diameter to grind to in this cycle.
- [A]: The allowance to leave on the final grind diameter. Defaults to 0.
- [W]: The percent of wheel to step over on each plunge. Defaults to 90.
- F: The feedrate to plunge in on the X axis.
- [H]: The amount of time to dwell after each plunge completes. Default is 0.

Example:
G00 G40 G54 G64 G80 G90.1 G98 G18 G20	(Safe Start Line)
T0101 									(Call wheel type)
G200 E1 								(Move to safety position)
G260 D0.0003 F10 E2 					(Wheel Dress before rough grind)
M3 S100                              	(Workhead on CW @ 100 RPM)
G271 X1.010 Z0.0 F10         			(Define left start position and rapid to position)
G272 R3.5 F10                      		(Define traverse distance between left and right side of wheel)
G274 X1.0 A.001 W75 H2     				(Multi-step plunge grind. Target position X, Allowance A, Step over percent W, Dwell H)
G260 D0.0003 F10 E2            			(Wheel Dress before finish grind)
G281 X1.0 A0.0 D0.0001 H2   			(Target position X, Allowance A, Infeed D, Sparkouts H)
G280                                    (End macro)
G200 E1                                	(Move to safety position)
M30                                     (End program)
%                                       (EOB)
G276: Approach Plunge Position
G276 sets the starting position for any following G287 plunge cycles and moves into position, as Z axis then X axis.
Parameters:
-
- X: Defines the starting X diameter for subsequent plunge cycles
- Z: Defines the starting Z position for subsequent plunge cycles
Example:
G00 G40 G54 G64 G80 G90.1 G98 G18 G20	(Safe Start Line)
T0101 									(Call wheel type)
G200 E1 								(Move to safety position)
G260 D0.0003 F10 E2 					(Wheel Dress before rough grind)
M3 S100                              	(Workhead on CW @ 100 RPM)
G276 X1.010 Z0.0	         			(Define plunge grind start position and rapid to position)
G287 X1.0 Z-0.02 F0.001 H2   			(Target position X, Target position Z, Feedrate F, Sparkout time H)
G280                                    (End macro)
G200 E1                                	(Move to safety position)
M30                                     (End program)
%                                       (EOB)
G277: Approach Face Grind Position
G277 is used in conjunction with G291 and G293 for face grinding with the side of the wheel. When Invoked, the wheel will rapid to the X position 1 and Z start position and set the X position 2 along with the traverse feedrate and dwell time.
Parameters:
- X: X position 1
- Z: Z start position
- R: X position 2
- [E]: The Part Correction Offset number (0-99). Applies a correction to X and Z axes. This is used to make small corrections to the different diameters or shoulders on the part.
- [F]: Traverse feedrate
- [H]: Traverse dwell time in seconds
Example:
G00 G40 G54 G64 G80 G90.1 G98 G18 G20	(Safe Start Line)
T0101 									(Call wheel type)
G200 E1 								(Move to safety position)
G260 D0.0003 F10 E2 					(Wheel Dress before rough grind)
M3 S100                              	(Workhead on CW @ 100 RPM)
G277 X4.0 Z0.0 R2.0 H1.0 F25.0	        (Define face grind start position and rapid to position)
G293 Z-0.1 A0.005 U0.25 F0.01 H1.5   	(Target position Z, Z Stock Allowance A, X Step Size U, Feedrate F, Sparkout time H)
G280                                    (End macro)
G200 E1                                	(Move to safety position)
M30                                     (End program)
%                                       (EOB)
G280: End of Grind Cycle
G280 will reset the dressing flag and clears grinding data.
G281: Traverse Grind with Infeed at Swing Position 1, Left
G281 does a traverse grind between the positions defined in G271 and G272 while infeeding the wheel incrementally by a defined infeed amount each time the wheel reaches swing position 1 (left), until the diameter defined by the finish diameter plus allowance amount has been reached, at which point a specified number of spark passes will happen.
Parameters:
-
- D: The infeed increment that X axis feeds in by each time the Z axis reaches swing position 1, left
- X: The final diameter to grind to during this cycle
- F: The feedrate to feed in at the X axis
- [A]: The allowance to leave on the final grind diameter. Defaults to 0.
- [H]: The number of spark passes to do after the grind completes. Default is 0.

Example:
G00 G40 G54 G64 G80 G90.1 G98 G18 G20	(Safe Start Line)
T0101 									(Call wheel type)
G200 E1 								(Move to safety position)
G260 D0.0003 F10 E2 					(Wheel Dress before rough grind)
M3 S100                              	(Workhead on CW @ 100 RPM)
G271 X 1.010 Z0.0 F10         			(Define left start position and rapid to position)
G272 R3.5 F10                      		(Define traverse distance between left and right side of wheel)
G274 X1.0 A.001 W75 H2     				(Multi-step plunge grind. Target position X, Allowance A, Step over percent W, Dwell H)
G260 D0.0003 F10 E2            			(Wheel Dress before finish grind)
G281 X1.0 A0.0 D0.0001 H2  				(Target position X, Allowance A, Infeed D, Sparkouts H)
G280                                    (End macro)
G200 E1                                	(Move to safety position)
M30                                     (End program)
%                                       (EOB)
G282: Traverse Grind with Infeed at Swing Position 2, Right
G282 does a traverse grind between the positions defined in G271 and G272 while infeeding the wheel incrementally by a defined infeed amount each time the wheel reaches swing position 2 (right), until the diameter defined by the finish diameter plus allowance amount has been reached, at which point a specified number of spark passes will happen.
Parameters:
-
- D: The infeed increment that X axis feeds in by each time the Z axis reaches swing position 2, right
- X: The final diameter to grind to during this cycle
- F: The feedrate to feed in at the X axis
- [A]: The allowance to leave on the final grind diameter. Defaults to 0.
- [H]: The number of spark passes to do after the grind completes. Default is 0.

Example:
G00 G40 G54 G64 G80 G90.1 G98 G18 G20	(Safe Start Line)
T0101 									(Call wheel type)
G200 E1 								(Move to safety position)
G260 D0.0003 F10 E2 					(Wheel Dress before rough grind)
M3 S100                              	(Workhead on CW @ 100 RPM)
G271 X 1.010 Z0.0 F10         			(Define left start position and rapid to position)
G272 R3.5 F10                      		(Define traverse distance between left and right side of wheel)
G274 X1.0 A.001 W75 H2     				(Multi-step plunge grind. Target position X, Allowance A, Step over percent W, Dwell H)
G260 D0.0003 F10 E2            			(Wheel Dress before finish grind)
G282 X1.0 A0.0 D0.0001 H2   			(Target position X, Allowance A, Infeed D, Sparkouts H)
G280                                    (End macro)
G200 E1                                	(Move to safety position)
M30                                     (End program)
%                                       (EOB)
G283: Continuous Infeed Grind
G283 is used in conjunction with G273 for grinding narrower features. When invoked, the wheel will rapid to the X and Z start positions and set the oscillation stroke defined with G273. The wheel will then feed in the specified "D" distance in X while traversing in each Z direction.
Parameters:
-
- X: The final diameter to grind to during this cycle
- D: The infeed increment that X axis feeds in by on each pass
- [A]: The allowance to leave on the final grind diameter. Defaults to 0.
- F: The feedrate to move at during this cycle
- [H]: The number of spark passes to do after the grind completes. Default is 0.

Example:
G00 G40 G54 G64 G80 G90.1 G98 G18 G18 G20		(Safe Start Line)
T0101											(Call wheel type)
G200 E1											(Move to safety positions)
M3 S100                              			(Workhead on CW @ 100 RPM)
G273 X2.050 Z-2.000 D0.200 H1.000				(Oscillation Position Definition, Left)
G283 X2.000 D0.005 F10.000						(Continuous Infeed Cycle)
G200 E1											(Move to safety positions)
M30												(Program Rewind)
%												(EOB)
G284: Traverse Grind with Infeed at Both Swing Positions
G284 does a traverse grind between the positions defined in G271 and G272 while infeeding the wheel incrementally by a defined infeed amount at each swing position, until the diameter defined by the finish diameter plus allowance amount has been reached, at which point a specified number of spark passes will happen.
Parameters:
-
- D: The infeed increment that X axis feeds in by each time the Z axis reaches a swing position
- X: The final diameter to grind to during this cycle
- F: The feedrate to feed in at the X axis
- [A]: The allowance to leave on the final grind diameter. Defaults to 0.
- [H]: The number of spark passes to do after the grind completes. Default is 0.

Example:
G00 G40 G54 G64 G80 G90.1 G98 G18 G20	(Safe Start Line)
T0101 									(Call wheel type)
G200 E1 								(Move to safety position)
G260 D0.0003 F10 E2 					(Wheel Dress before rough grind)
M3 S100                              	(Workhead on CW @ 100 RPM)
G271 X 1.010 Z0.0 F10         			(Define left start position and rapid to position)
G272 R3.5 F10                      		(Define traverse distance between left and right side of wheel)
G274 X1.0 A0.001 W75 H2    				(Multi-step plunge grind. Target position X, Allowance A, Step over percent W, Dwell H)
G260 D0.0003 F10 E2            			(Wheel Dress before finish grind)
G284 X1.0 A0.0 D0.0001 H2   			(Target position X, Allowance A, Infeed D, Sparkouts H)
G280                                    (End macro)
G200 E1                                	(Move to safety position)
M30                                     (End program)
%                                       (EOB)
G285: Shoulder Grind at Swing Position 1, Left
G285 works with G271 and G272 or G273. G285 does a shoulder grind in the negative Z direction, starting from swing position 1, left. This means it will move outside of the area defined by G271 and G272. G285 will grind to a defined Z position, leaving space for an optional stock allowance.
Parameters:
-
- Z: The Z target position to grind to.
- [X]: The diameter to rapid X to before grinding in the Z direction.
- D: Feedrate to move the Z axis at.
- [A]: The allowance to leave on the final grind position. Defaults to 0.
- [H]: The amount of spark out time once final grind position is reached. Defaults to 0.

Example:
G00 G40 G54 G64 G80 G90.1 G98 G18 G18 G20		(Safe Start Line)
T0101											(Call wheel type)
G200 E1											(Move to safety positions)
M3 S100                              			(Workhead on CW @ 100 RPM)
G271 X2.050 Z0.000 F10.000 H1.000				(Swing Position 1 Definition, Left)
G272 R3.000 F20.000 H2.000						(Swing Position 2 Definition, Right)
G285 Z-1.000 D0.005								(Left Shoulder Grind Cycle)
G200 E1											(Move to safety positions)
M30												(Program Rewind)
%												(EOB)
G286: Shoulder Grind at Swing Position 2, Right
G286 works with G271 and G272 or G273. G286 does a shoulder grind in the positive Z direction, starting from swing position 2, right. This means it will move outside of the area defined by G271 and G272. G286 will grind to a defined Z position, leaving space for an optional stock allowance.
Parameters:
-
- Z: The Z target position to grind to.
- [X]: The diameter to rapid X to before grinding in the Z direction.
- D: Feedrate to move the Z axis at.
- [A]: The allowance to leave on the final grind position. Defaults to 0.
- [H]: The amount of spark out time once final grind position is reached. Defaults to 0.

Example:
G00 G40 G54 G64 G80 G90.1 G98 G18 G18 G20		(Safe Start Line)
T0101											(Call wheel type)
G200 E1											(Move to safety positions)
M3 S100                              			(Workhead on CW @ 100 RPM)
G271 X2.050 Z0.000 F10.000 H1.000				(Swing Position 1 Definition, Left)
G272 R3.000 F20.000 H2.000						(Swing Position 2 Definition, Right)
G286 Z4.000 D0.005								(Right Shoulder Grind Cycle)
G200 E1											(Move to safety positions)
M30												(Program Rewind)
%												(EOB)
G287: Plunge Infeed Grind
G287 is used in conjunction with G276 for two axis plunge grinding. G276 defines the start point of the grind and G287 defines the ending position of the plunge grind.
Parameters:
-
- [X]: The final X diameter to plunge to
- [Z]: The final Z position to plunge to
- [A]: The allowance to leave on final grind position in both X and Z axes. Default is 0.
- F: The feedrate to plunge grind at.
- [H]: The amount of time to dwell after reaching plunge depth. Defaults to 0.
At least one of X or Z must be called in the cycle, if not both axes.

Example:
G00 G40 G54 G64 G80 G90.1 G98 G18 G20	(Safe Start Line)
T0101 									(Call wheel type)
G200 E1 								(Move to safety position)
G260 D0.0003 F10 E2 					(Wheel Dress before rough grind)
M3 S100                              	(Workhead on CW @ 100 RPM)
G276 X1.010 Z0.0	         			(Define plunge grind start position and rapid to position)
G287 X1.0 Z-0.02 F0.001 H2   			(Target position X, Target position Z, Feedrate F, Sparkout time H)
G280                                    (End macro)
G200 E1                                	(Move to safety position)
M30                                     (End program)
%                                       (EOB)
G288: Handwheel Infeed Cycle
This cycle allows the operator to manually jog the X axis with the MPG handwheel or operator panel while the Z axis maintains the motion defined by G271 and G272. The cycle will continue until the operator presses Cycle Start or stops the program. Jogging on all axes other than X will be disabled during this cycle. There are no parameters for this cycle.
Upon pressing Cycle Start, the operator will be presented with a confirmation dialog on the control screen that they wish to end the handwheel infeed cycle. If they select 'No', the cycle will continue until they choose to end it again. If they select 'Yes', then the Z axis will continue its cycling until it reaches swing position 1, defined by G271, and then the main program will continue. While the axis is returning to swing position 1, a progress dialog will be displayed on the control screen.
If the operator presses Feedhold during the handwheel cycle, the Z axis will continue until it reaches the next swing position, and then stop there until Cycle Start is pressed or the program is stopped.
If the operator presses Cycle Stop while this cycle is running, the Z axis will stop without returning to either swing position. To control the distance that the axis takes to stop, set the parameter in MachMotion Configuration for Reciprocating Axis - Z Axis - Cycle Stop Distance.

Example:
G00 G40 G54 G64 G80 G90.1 G98 G18 G18 G20		(Safe Start Line)
T0101											(Call wheel type)
G200 E1											(Move to safety positions)
M3 S100                              			(Workhead on CW @ 100 RPM)
G271 X2.050 Z0.000 F10.000 H1.000				(Swing Position 1 Definition, Left)
G272 R3.000 F20.000 H2.000						(Swing Position 2 Definition, Right)
G288 											(Handwheel Infeed Cycle)
G200 E1											(Move to safety positions)
M30												(Program Rewind)
%												(EOB)
G289: Relieve
G289 performs a retract in X and Z axes. The cycle preceding G289 determines which axis and the direction of the retract. If G289 follows G281, G282, G283, G284, or G288, then the retract will be a positive X axis move. If G289 follows G285, then the retract will be a positive Z axis move. If G289 follows G286, then the retract will be a negative X axis move.
Parameters:
-
- [W]: Relieve amount
- [F]: Feedrate
Example:
G00 G40 G54 G64 G80 G90.1 G98 G18 G18 G20		(Safe Start Line)
T0101											(Call wheel type)
G200 E1											(Move to safety positions)
M3 S100                              			(Workhead on CW @ 100 RPM)
G271 X2.050 Z0.000 F10.000 H1.000				(Swing Position 1 Definition, Left)
G272 R3.000 F20.000 H2.000						(Swing Position 2 Definition, Right)
G288 											(Handwheel Infeed Cycle)
G289											(Retract)
M30												(Program Rewind)
%												(EOB)
Measuring Cycles
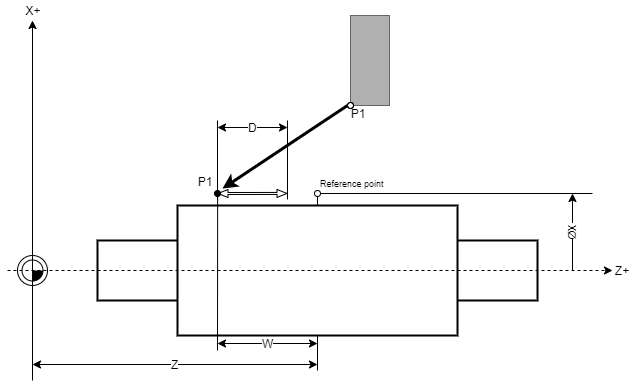
G230: Active Flagging with Probe
Flagging is used to find a shoulder on the part. When G230 is called the X axis will move to the X swivel position followed by the Z axis. The flagging slide will extend and then the Z axis will move to the Z start position followed by the X axis. The probing cycle will start with the Z axis moving at the calibrated fast feedrate. When the shoulder is detected, the probe will back off and probe again at the calibrated slow feedrate. The K parameter will be written to the current fixture offset (which defaults to G54) and the fixture table will be saved. The probe will move back to the start position, then back to the swivel position, and then retract.
Parameters:
-
- X: The start position X will rapid to before starting the flagging routine, after flag is extended.
- Z: The start position Z will rapid to before starting the flagging routine, after flag is extended.
- W: The distance Z will move searching for a shoulder, which can be positive or negative to indicate direction of travel.
- [E]: Selects between flagging the part and calibrating the probe. E1 will calibrate the probe. Defaults to 0 for normal flagging.
- [K]: The Z position used to calibrate the shoulder. Default is 0.
- [R]: Indicates if to retract the probe at the end of cycle. A value of 1 will leave the probe extended at the end of the cycle. Default is 0 to retract the probe.
Example:
G00 G40 G54 G64 G80 G90.1 G98 G18 G18 G20		(Safe Start Line)
T0101											(Call wheel type)
M5		                             			(Workhead off)
G230 X2.0 Z0.2 W-1.0 K0.0						(Active Flagging Cycle)
M30												(Program Rewind)
%												(EOB)
When the flagging device is extended the X and Z axis reference switches from the wheel to the probe tip.
Path to swivel position and extend flagging probe:

Path to part from swivel position:

Flagging move from X and Z start position:

Appendix
Cycle States
| 0 | Idle |
| 1 | Positioning |
| 2 | Spark-out |
| 3 | Finished |
| 4 | Free Pass |
| 100 | Grinding |
| 101 | Positioning |
| 102 | Spark-out |
| 103 | Finished |
| 104 | Free Pass |
| 105 | Moving to Grind Position |
| 106 | Gap Control Grinding |
| 200 | Dressing |
| 201 | Positioning |
| 202 | Spark-out |
| 203 | Finished |
| 204 | Free Pass |
| 205 | Moving to Dress Position |
| 206 | Returning from Dress Position |
| 207 | Gap Control Dressing |
Wheel Head Memory
| Pound Variable | Description |
| #9000 | Diameter |
| #9001 | Effective Width |
| #9002 | Overhang |
| #9003 | Minimum Diameter |
| #9004 | Minimum Width |
| #9005 | Working Angle |
| #9006 | Corner Radius Left |
| #9007 | Relief Angle Left |
| #9008 | Relief Height Left |
| #9009 | Corner Radius Right |
| #9010 | Relief Angle Right |
| #9011 | Relief Height Right |
| #9012 | Phase Height Left |
| #9013 | Phase Height Right |
| #9014 | Max Wheel RPM |
| #9015 | Wheel SFM |
| #9016 | Wheel RPM |
| #9017 | Dresser Diamond Type |
| #9018 | X Position Diamond 1 |
| #9019 | Z Position Diamond 1 |
| #9020 | X Position Diamond 2 |
| #9021 | Z Position Diamond 2 |
| #9022 | X Position Diamond 3 |
| #9023 | Z Position Diamond 3 |
| #9024 | Tip Radius Diamond 1 |
| #9025 | Tip Radius Diamond 2 |
| #9026 | Tip Radius Diamond 3 |
| #9027 | Infeed Angle |
| #9028 | Feed Factor 1 |
| #9029 | Feed Factor 2 |
| #9030 | Xsw Safety Position |
| #9031 | Zs Safety Position |
| #9032 | Xsd Safety Position |
| #9033 | Deta X Safety Clearance |
| #9034 | Deta ZL Safety Clearance |
| #9035 | Deta ZR Safety Clearance |
| #9036 | X Return Clearance |
| #9037 | Z Return Clearance |
| #9040 | Current Commanded RPM |
| #9041 | Wheel Dressing SFM |
| #9042 | Rotary Dresser Roll Diameter |
| #9043 | Rotary Dresser SFM |
| #9044 | Rotary Dresser RPM |
| #9045 | Current Rotary Dresser Rpm |
| #9046 | X Dresser Offset (Optional) |
| #9047 | Rotary Dresser Maximum RPM |
| #9048 | Wheel Speed Mode |
| #9049 | Rotary Dresser Surface Feet Per Min Mode |
| #9050 | Rotary Dresser Direction (0 = FWD,1 = REV) |
| #9051 | Teach New Wheel Dresser Offset 1 |
| #9052 | Teach New Wheel Dresser Offset 2 |
| #9060 | Wheel Type |
| #9080 | Current Cycle State |
| #9081 | Current Cycle Type |
| #9082 | Current Cycle Passes Remaining |
| #9083 | Parts Per Dress Cycle |
| #9084 | Parts Since Last Dress Cycle |
| #9085 | Part Count On Last Dress Cycle |
| #9086 | Parts Per Dress Cycle Enabled |
| #9100 | Work Head Diameter |
Active Flagging Memory
|
#9230 |
Active Flag X Swivel Position (Machine Zero) |
| #9231 | Active Flag Z Swivel Position (Machine Zero) |
|
#9232 |
Active Flag Tip Diameter |
| #9233 | Active Flag Fast Feedrate |
| #9234 | Active Flag Slow Feedrate |
| #9235 | Active Flag Back-Off Distance |
| #9236 | Active Flag Z- Probe Offset |
| #9237 | Active Flag Z+ Probe Offset |
| #9238 | Active Flag X Measured Position |
| #9239 | Active Flag Z Measured Position |
Global Memory
|
#9250 |
Angle of last grind cycle |
| #9260 | Relieve Amount |
| #9261 | In Cycle Re-position Feedrate |
| #9262 | In Cycle Re-position Clearance Amount |
GCode Parameters
|
1900 |
Gap Control |
| 1910 | Wheel Diameter Lock (1 = Lock, 0 = Unlock) |
|
1911 |
Wheel Width Lock (1 = Lock, 0 = Unlock) |
Cycle Types
{{@677}}