Global Messaging - Mach4
Global Messaging Version 3
1. Access Global Messaging
To setup Global Messaging go to Configuration -> Plugin -> Global Messaging System.

2. Message Control

There are five actions that can be done on a message: create, delete, duplicate, import, and export.
To create a new message, press the green plus button. This will add an unnamed alarm message to the list and select it for editing.
To delete a message from the list, select the message to be deleted and press the red X button. This will remove the message from the list and then select the next message.
To create a copy of a message, select the message to be duplicated from the list and press the button with the two papers on it. This will add a new message to the list with all settings copied from the selected message.
To import messages, press the button with the downwards arrow. You will be asked to select and INI file that contains the messages you want to import. After selecting the file, the messages that are in that file will be added to the list. If there are any messages currently configured that are duplicated, the control will ask if you would like to overwrite the existing messages.
To export messages, press the upwards arrow button. You will be asked to select which messages you wish to export, and then asked for a file location to save them to.
The message selected in the leftmost list is the one actively being edited.
3. Configure Action
There are four classes of actions that a message can fall under: Alarm, Warning, Notice, and Process. An alarm can take emergency actions, such as disabling or turning off power. A warning has many actions it can do, and will always prevent cycle start from being pressed while a warning is active. A notice takes no actions, but presents the operator with a message. A process has all the same potential actions a warning has, but does not alert the operator and does not prevent cycle start.

After selecting the action class, you can select the more specific action this message will do when activated. For example, I have selected "Class: Alarm" and now I want the "Action: Disable Software".
Some actions allow you to select a secondary action. For instance, a warning with "Action: Escalate to Alarm" allows you to select what alarm action you would like to take. There is a field for 'Action Timing', which is how many milliseconds after the first action that the second action will happen.
Additionally, you can set the actions to repeat while the message is active. The message will do the first action again, and wait the appropriate time before doing the second action (if there is one configured). This process will loop while the message is active.

3a. Custom Actions
 If none of the standard actions suit your purposes, you can also create custom actions. This can only be done for the Warning and Process classes of messages. To create a custom action, select 'Custom' from the action list, and then click on the "Customize" button next to the action. This button is only enabled when you select the Custom item from the action list. Pressing this button will open a new window.
Here you can create a list of things to happen when the message activates. You first select and action type, fill out the details about the action, and then press "Add Action". This list can be reordered by selecting an item and using the arrow buttons to move them up or down and the red x to remove them from the list.

An item can be double-clicked on to be edited, and then you should press "Update Action" to save your changes.
Items will be resolved sequentially in the order they appear in the list, with no pauses in between items.
4. Setup Details
After
Most have selected the "Action" you will need to add a title to the Message and a description thatmessages will display an alert when the message triggers.conditions activate. The information displayed for the alert are edited in the details section of the message.
This same section is where you can also password protect a message. The password will be needed for editing and clearing the message.
 Additionally, you can create a register that the message will write it's current status to. This will include information about the enabled/disabled state of the message and the idle/active state of the message.
If your selected action is 'Execute Script', this section is where you will set which script to run. The configured script should have a .mcs extension.
Lastly, there is an option to disable the entire message here. The message will not be deleted, but it will not check conditions or activate until the message is re-enabled.
5. Set Conditions
Next,A message will do its configured action based on the conditions that are set for it. To edit these conditions, you will need to select editthe conditions'Edit Conditions' button. The following window will be displayed.

Conditions are made up of sets and items, where each set can contain items and subsets. Sets determine what logic to use on the items and subsets they contain.
This window you will be able to set IO and and other "Conditions" for the message to trigger.
Start with step one as shown in the GUI by selecting the logic set and click "Add Set" (Typically an "Operator: AND" is used).
Next, setup the condition in step two as shown in the GUI by selecting the conditions. Click "Update Condition" when done.
You can also setup a condition where the machine has to be enabled. Just set the "Device" to "Output Signals" and set it to be "Machine Enabled". (shown below)

Before adding anymore condition sets or closing the window be sure to click "Add Set" and "Add Condition".
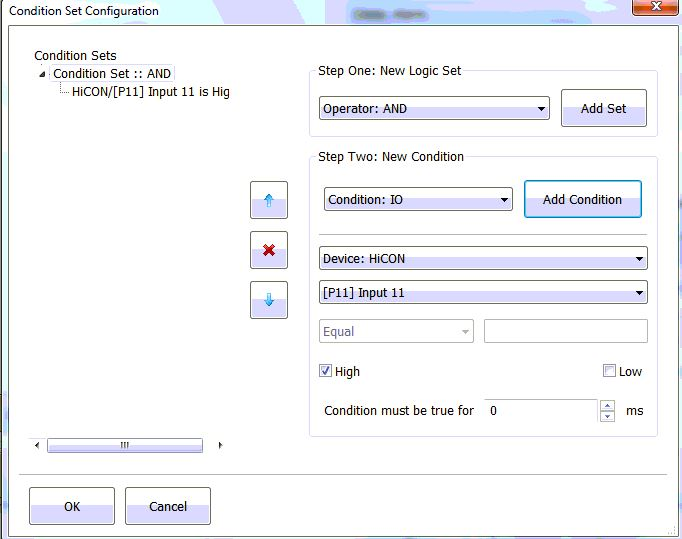
Once you have set the "Conditions" you can click "Ok"
6. Save Changes
NowPressing click'Save' "Save"will save all messages and exit config. Pressing 'Cancel' will discard all changes and exit config.

Keywords: 14530