Auto Tool Changer Manual Override
Auto Tool Changer Manual Override is used when you have a tool that doesn't fit in the tool changer magazine and needs to be manually loaded and unloaded from the spindle.
This feature was added to build number 26546 - 22 February, 2025
Enable User Fields in the Tool Table
- Edit Configure -> Plugins -> MachMotion
- FIlter for Tool Changer and then set the Tool Changer Method to Auto

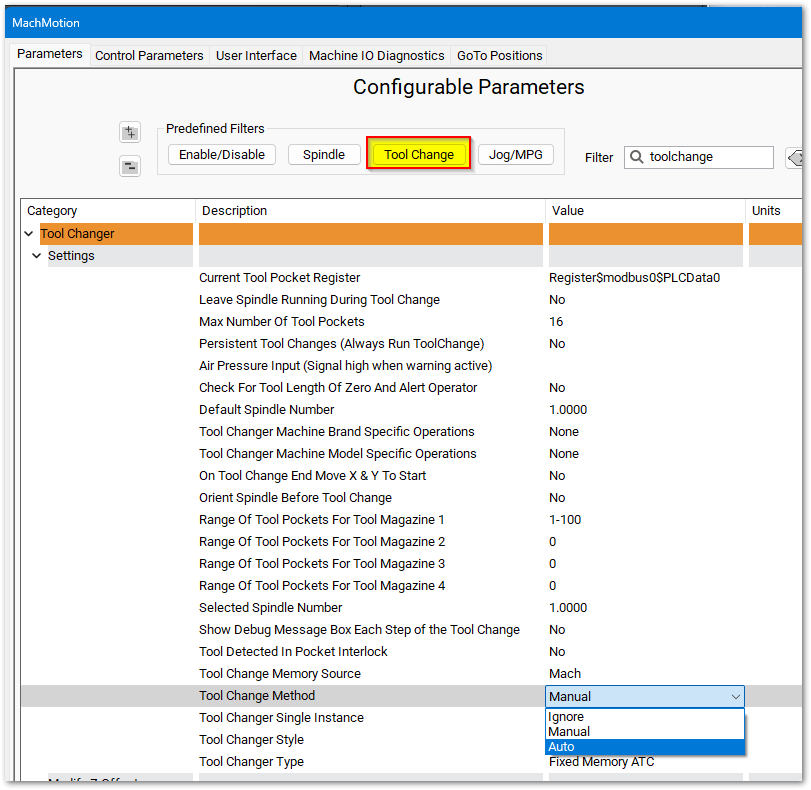
Mark - Open
Forthe tool table - Under the View menu, select User Fields and the Tool Changer Override column will be displayed.

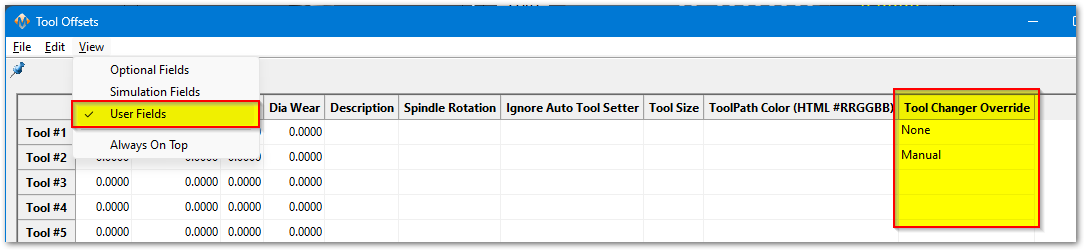
Your options are to leave it blank, or select None (no override) or select Manual Tool Changefor
There is a column in the Tool Tabletools that allows you to specify for which Tools need towill be manually changed. The options are "None" which means there is no override or "Manual" which means this Tool will need to be manually loadedloading into the spindle.

Operation
When executing a Tool Changer Override the Tool Change sequence is a bit of a hybrid between a Auto Tool Change and a Manual Tool Change sequence.
If the Spindle is loaded with a Tool from the Tool Magazine it will drop off that tool into the magazine and then move to the Manual Tool Change location and wait for the operator to manually load the tool into the spindle. The operator will need to open and close the draw bar using the Tool Release Button.
When the Tool needs to be manually loaded this is the dialog that will appear.

If the Spindle is loaded with a Tool that is configured for Manual this dialog will appear. The operator will need to open and close the draw bar using the Tool Release Button to remove the tool from the spindle.
When the Tool needs to be manually Unloaded this is the dialog that will appear.

When the Tool needs to be manually Unloaded and then the new tool manually loaded this is the dialog that will appear.

Configuration
Configure the Location for Manual Tool Changes
Configure a "GoTo Position" for the location you want the machine to move to when the operator loads and unloads the tool into the spindle.
Follow this link for more information on how to setup GoTo Positions.
Make sure the check box named "Use as Tool Change position (P1)" is checked.
Configure the Highest allowed Tool Number
Go to Configure>Control>Tools
Change the "Max Tools" value to whatever your highest tool number.

Add New Tool Range
It is possible to Override a tool that is mapped to a Tool Pocket, but this would waste that Tool Pocket because the machine will never try to use it.
The advised way of using this feature would be to modify the ToolInfo.lua and setup an additional group/range of tools that are not assigned to Tool Pockets.
Open the following file in Notepad ++ "C:\Mach4\Profiles\"Your Profile Name"\ToolTables\ToolInfo.Lua"
Default Configuration:
----- Tool Configuration Info -----
-- Global Variables --
-- Production needs to configure these variables before shipping
TOOL_NAMES = {
	{["Name"] = "Spindle Empty", ["Start"] = 0, ["End"] = 0, ["UseToolPocket"] = 1},
	{["Name"] = "Spindle (1)", ["Start"] = 1, ["End"] = 99, ["UseToolPocket"] = 1},
	{["Name"] = "Spindle (2)", ["Start"] = 100, ["End"] = 100, ["UseToolPocket"] = 0},
	{["Name"] = "Spindle (3)", ["Start"] = 999, ["End"] = 999, ["UseToolPocket"] = 0},
	{["Name"] = "Spindle (4)", ["Start"] = 999, ["End"] = 999, ["UseToolPocket"] = 0},
	{["Name"] = "Saw (1)", ["Start"] = 999, ["End"] = 999, ["UseToolPocket"] = 0},
	{["Name"] = "Saw (2)", ["Start"] = 999, ["End"] = 999, ["UseToolPocket"] = 0},
	{["Name"] = "Drill Bank (1)", ["Start"] = 999, ["End"] = 999, ["UseToolPocket"] = 0},
	{["Name"] = "Drill Bank (2)", ["Start"] = 999, ["End"] = 999, ["UseToolPocket"] = 0},
	{["Name"] = "Laser", ["Start"] = 250, ["End"] = 250, ["UseToolPocket"] = 0}
}
New row added with a range of Tool numbers starting from Tool #100 to Tool #199 with the option "UseToolPocket" set to 0.
----- Tool Configuration Info -----
-- Global Variables --
-- Production needs to configure these variables before shipping
TOOL_NAMES = {
	{["Name"] = "Spindle Empty", ["Start"] = 0, ["End"] = 0, ["UseToolPocket"] = 1},
	{["Name"] = "Spindle (1)", ["Start"] = 1, ["End"] = 99, ["UseToolPocket"] = 1},
    {["Name"] = "Spindle (1) Manual", ["Start"] = 100, ["End"] = 199, ["UseToolPocket"] = 0},
	{["Name"] = "Spindle (2)", ["Start"] = 100, ["End"] = 100, ["UseToolPocket"] = 0},
	{["Name"] = "Spindle (3)", ["Start"] = 999, ["End"] = 999, ["UseToolPocket"] = 0},
	{["Name"] = "Spindle (4)", ["Start"] = 999, ["End"] = 999, ["UseToolPocket"] = 0},
	{["Name"] = "Saw (1)", ["Start"] = 999, ["End"] = 999, ["UseToolPocket"] = 0},
	{["Name"] = "Saw (2)", ["Start"] = 999, ["End"] = 999, ["UseToolPocket"] = 0},
	{["Name"] = "Drill Bank (1)", ["Start"] = 999, ["End"] = 999, ["UseToolPocket"] = 0},
	{["Name"] = "Drill Bank (2)", ["Start"] = 999, ["End"] = 999, ["UseToolPocket"] = 0},
	{["Name"] = "Laser", ["Start"] = 250, ["End"] = 250, ["UseToolPocket"] = 0}
}
This is the line that was added:
{["Name"] = "Spindle (1) Manual", ["Start"] = 100, ["End"] = 199, ["UseToolPocket"] = 0},
Now you should be configured to allow Tool calls using M6 T100 - M6 T199 for manual Tool Changes.