Global Monitoring System
Configure the Global Monitoring System
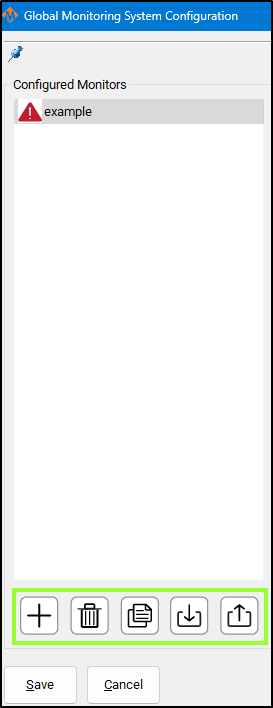
To set up the Global Monitoring System go to Configuration -> Plugins -> Global Monitoring System.

Working with configured monitors
|
The monitoring system provides five main functions for managing monitors: 1. Create a Monitor
2. Delete a Monitor
3. Duplicate a Monitor
4. Import Monitors
5. Export Monitors
Active Monitor The monitor selected in the leftmost list is the one currently active for editing. |
 |
Configure Action
The monitoring system can initiate four classes of actions: Alarm, Warning, Notice, and Process.
Each class defines how the system responds to detected conditions.
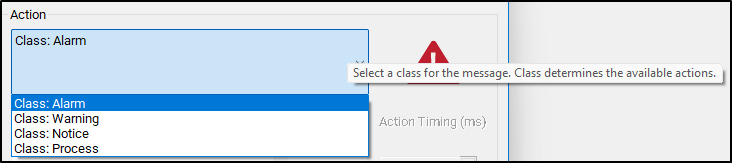
1. Alarm
-
Used for emergency conditions.
-
Can take immediate safety actions, such as:
-
Disabling the machine.
-
Stopping all motion.
-
-
Requires operator intervention before restarting.
2. Warning
-
Used for non-critical issues that still require attention.
-
Can perform various automated actions.
-
Prevents Cycle Start while active.
-
Alerts the operator through a visible or audible signal.
3. Notice
-
Used for informational messages only.
-
Takes no automatic actions.
-
Displays a message to the operator for awareness.
4. Process
-
Used for background control actions.
-
Has the same potential actions as a Warning,
but does not alert the operator and does not block Cycle Start.
Tip: Use Alarm for safety-critical faults, Warning for operational issues, Notice for information, and Process for silent automation tasks.
 After selecting the Action Class, you can define the specific action the monitor performs when it becomes active.
Primary and Secondary Actions
-
Each monitor has one primary action.
-
Some actions allow a secondary action.
-
Example:
-
A Warning with Action: Escalate to Alarm can trigger a chosen Alarm action after a delay.
-
-
Action Timing
-
The Action Timing field defines the delay (in milliseconds) between the first and second actions.
-
Example:
If Action Timing = 5000, the secondary action runs 5 seconds after the primary action.
Repeating Actions
-
You can configure the monitor to repeat actions while it remains active.
-
When enabled:
-
The monitor executes the first action.
-
Waits for the defined Action Timing period.
-
Executes the second action (if configured).
-
Repeats this cycle until the monitor condition is no longer active.
-
Tip: Use repeating actions for persistent conditions that require continuous alerts or repeated control signals.

Custom Actions
 If none of the standard actions suit your purposes, you can also create custom actions. This can only be done for the Warning and Process classes of monitors. To create a custom action, select Custom from the action list, and then click on the Customize button next to the action. This button is only enabled when you select the Custom item from the action list. Pressing this button will open a new window.
Here you can create a list of things to happen when the monitor activates. You first select and action type, fill out the details about the action, and then press Add Action. This list can be reordered by selecting an item and using the arrow buttons to move them up or down and the red x to remove them from the list.

An item can be double-clicked on to be edited, and then you should press Update Action to save your changes.
Items will be resolved sequentially in the order they appear in the list, with no pauses in between items.
Setup Details

Most monitors will display an alert when the monitor conditions activate. The information displayed for the alert are edited in the details section of the monitor.
This same section is where you can also password protect a monitor. The password will be needed for editing and clearing the monitor.
 Additionally, you can create a register that the monitor will write it's current status to. This will include information about the enabled/disabled state of the monitor and the idle/active state of the monitor.
If your selected action is Execute Script, this section is where you will set which script to run. The configured script should have a .mcs extension.
Lastly, there is an option to disable the entire monitor here. The monitor will not be deleted, but it will not check conditions or activate until the monitor is re-enabled.
Set Conditions
A monitor will do its configured action based on the conditions that are set for it. To edit these conditions, you will need to select the Edit Conditions button. The following window will be displayed.

Conditions are made up of sets and items, where each set can contain items and subsets. Sets determine what logic to use on the items and subsets they contain. There are three options for sets: AND, OR, and NOT. An AND set requires all of its items and subsets to be true before it will say it is true. An OR set only requires that at least one of its items or subsets is true for it to be true. A NOT set requires that all items and subsets are false, in order for it to be true. By combining these sets, complicated logic can be created.
Most monitors will only need a single AND set. To add a new set, select the parent set it should belong to and the set type from the list, and press Add Set.
 To add an item to a set, select the item type from the drop down and fill in the details, then press Add Condition.
A common condition is to require the machine to be enabled. To add this condition, select condition type of signal, then output signals, and then machine enabled. After those are selections are made, press Add Condition.
To edit a set, double click on it in the left-hand display. This will allow you to change the set type and press update. Similarly, you can double click on a condition to edit and update the condition.
Pressing OK will save changes and Cancel will discard all changes.

Save Changes
Pressing Save will save all monitors and exit config. Pressing Cancel will discard all changes and exit config.

Common GMS Templates
See the attached ini files to download and import standard GMS functions.
SpindleWarmupBackup.ini
If you run a file when the spindle is not warmed up, it will warm up the spindle and then go ahead and run the file. As a safety feature, you can prevent a file from starting until spindle warmup is completed to avoid this issue.
Diagnostics
The Global Monitoring System icon is on most screens, and will indicate if there is currently an alarm or warning active. If there are no alarms or warnings active, then the icon will be a green checkmark. If there is an alarm or warning active, it will flash a red and yellow error triangle. Clicking on the icon will open the diagnostics window.


The diagnostics window will show all configured monitors and their data. The condition tree will show the state of each condition by highlighting true conditions in green. A red condition means that the condition is incorrectly configured and cannot be checked.
Alarms and warnings must be cleared to operate the machine. Pressing Reset on the operator panel will clear alarms. They can also be cleared in the diagnostics be clicking Clear All. Resetting a monitor will transition the monitor back to the idle state and reset the timers on all conditions. If the conditions on a monitor are still true, then the monitor will activate again immediately.
A monitor can be temporarily disabled here. The monitor will continue to check it's conditions and change states, but will not take any actions when it transitions out of the idle state. The monitor will re-enable itself when it transitions back to idle state or when the operator enables it again.
