MachPro Plasma Setup Manual
{{@2007#bkmrk--1}}
MachPro 26 CNC Software Roadmap

Configure Motion Controller
Please refer to your motion controller's documentation to:
- Establish the network connection to the MachPro computer
- Connect and configure drives
- Connect and configure I/O
- Calibrate the axes
- Establish machine zero
- Configure soft limits
MachPro needs to be integrated with your motion controller. If you have an M31 use the M31 Motion Control Setup Manual If you have a compatible motion controller, then use MachPro Compatible Motion Controller Configuration Settings
Languages
{{@2205}}
Default I/O Mappings
For both input and output signals: refer to the Mapping Signals section of the MachPro motion control configuration documentation for your motion controller. See the links in the table above. Manually trigger all inputs to verify they show correctly in the software, and manually trigger all outputs from the software to make sure that the device will operate properly.
A spreadsheet is attached (upper left corner of this window) with the default I/O signal mappings. You may print it for your use during the I/O configuration.
- Wiring reference and change notes
- Update descriptions in Input and Output signals configuration to match the way you have used the system previously
- Reference for future maintenance and updates to your system
Inputs
| SignalID | SignalName | Enabled | Device/Name | Active Low | State | Description |
| 1 | Input #0 | 1 | M31/1DI.01.00 | 0 | GENERAL INPUT 0 (1DI.01.00) | |
| 2 | Input #1 | 1 | M31/1DI.01.01 | 0 | GENERAL INPUT 1 (1DI.01.01) | |
| 3 | Input #2 | 1 | M31/1DI.01.02 | 0 | GENERAL INPUT 2 (1DI.01.02) | |
| 4 | Input #3 | 1 | M31/1DI.01.03 | 0 | GENERAL INPUT 3 (1DI.01.03) | |
| 5 | Input #4 | 1 | M31/1DI.01.04 | 0 | ARC OK (1DI.01.04) | |
| 6 | Input #5 | 1 | M31/1DI.01.05 | 0 | BREAKAWAY ERROR (1DI.01.05) | |
| 7 | Input #6 | 1 | M31/1DI.01.06 | 0 | PLASMA ERROR (1DI.01.06) | |
| 8 | Input #7 | 1 | M31/1DI.01.07 | 0 | AIR PRESSURE (1DI.01.07) | |
| 65 | Motor 0 Home | 1 | M31/1DI.01.09 | 0 | X1 HOME (1DI.01.09) | |
| 66 | Motor 1 Home | 1 | M31/1DI.01.11 | 0 | Y HOME (1DI.01.11) | |
| 67 | Motor 2 Home | 1 | M31/1DI.01.12 | 0 | Z HOME (1DI.01.12) | |
| 68 | Motor 3 Home | 1 | M31/1DI.01.13 | 0 | X2 HOME (1DI.01.13) | |
| 97 | Motor 0 ++ | 1 | M31/1DI.01.08 | 0 | X LIMIT ++ (1DI.01.08) | |
| 98 | Motor 1 ++ | 1 | M31/1DI.01.10 | 0 | Y LIMIT ++ (1DI.01.10) | |
| 99 | Motor 2 ++ | 1 | M31/1DI.01.12 | 0 | Z LIMIT ++ (1DI.01.12) | |
| 129 | Motor 0 -- | 1 | M31/1DI.01.09 | 0 | X LIMIT -- (1DI.01.09) | |
| 130 | Motor 1 -- | 1 | M31/1DI.01.11 | 0 | Y LIMIT -- (1DI.01.11) | |
| 161 | Probe | 1 | M31/1DI.01.14 | 0 | PROBE (1DI.01.14) | |
| 164 | E-Stop | 1 | M31/1DI.ESTP | 0 | ESTOP (1DI.ESTP) | |
| 183 | Probe1 | 1 | M31/1DI.01.15 | 0 | PROBE 2 (1DI.01.15) | |
| 251 | Input #100 | 1 | M31/1DI.ALRM | 0 | DRIVE FAULT (1DI.ALRM) |
Outputs
| SignalID | SignalName | Enabled | Device/Name | Active Low | State | Description |
| 1050 | Output #0 | 1 | M31/1DO.01.00 | 0 | GENERAL OUTPUT 0 (1DO.01.00) | |
| 1051 | Output #1 | 1 | M31/1DO.01.01 | 0 | GENERAL OUTPUT 1 (1DO.01.01) | |
| 1052 | Output #2 | 1 | M31/1DO.01.02 | 0 | GENERAL OUTPUT 2 (1DO.01.02) | |
| 1053 | Output #3 | 1 | M31/1DO.01.03 | 0 | GENERAL OUTPUT 3 (1DO.01.03) | |
| 1054 | Output #4 | 1 | M31/1DO.01.04 | 0 | VENT (1DO.01.04) | |
| 1055 | Output #5 | 1 | M31/1DO.01.05 | 0 | LASER (1DO.01.07) | |
| 1056 | Output #6 | 1 | M31/1DO.01.06 | 0 | SCRIBE TOOL (1DO.01.06) | |
| 1057 | Output #40 | 1 | M31/1DO.01.07 | 0 | TORCH (1DO.01.05) | |
| 1142 | Spindle Fwd | 1 | M31/1DO.FE | 0 | (DRILLFORWARD) 1DO.FE | |
| 1143 | Spindle Rev | 1 | M31/1DO.RE | 0 | (DRILL REVERSE) 1DO.RE |
Voltage: divider, multiplier, live
Voltage management is a major factor in your plasma operation.
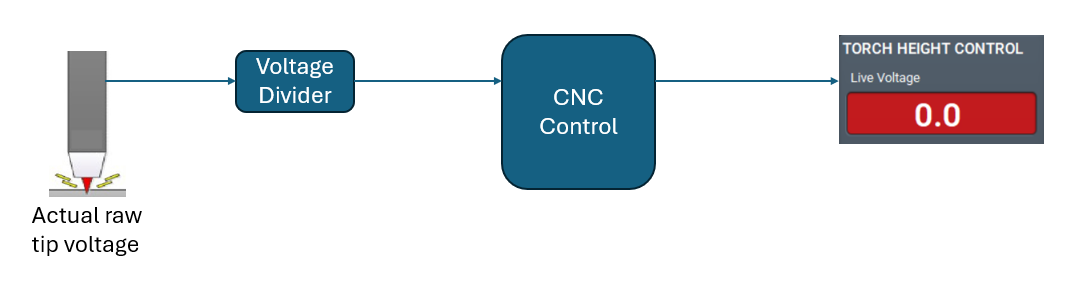
The Raw Tip Voltage is far too high to be read directly by your CNC control.
The Live Voltage DividerFeedback Scaled (Divided) takes the Raw Tip Voltage and reduces it by a set ratio using a resistor network. It provides a fraction of the original voltage to the CNC control, and that is usable by the control. Sometimes that resistor network isn't totally accurate, and it reports a voltage value to the CNC control that isn't exactly the rated ratio.
The CNC control usestakes the provideddivided voltagevoltage, multiplies the value and works with that number to manage the plasma cuts. It usesNormally the Live Voltage Feedback Multiplier toshould calculate the raw tip voltage based on the voltage provided bymatch the Live Voltage DividerFeedback Scaled (divided). This is whereHowever, the Live Voltage Feedback Multiplier is just a multiplier and it can be usedchanged to correct anyinaccurate problemsscaled/divided with the voltage from the divider.values.
If your voltage system is providing good production quality without any fudge factors, then you may skip the following section. If you find that the reported voltage on the screen is not quite right, then this will help.
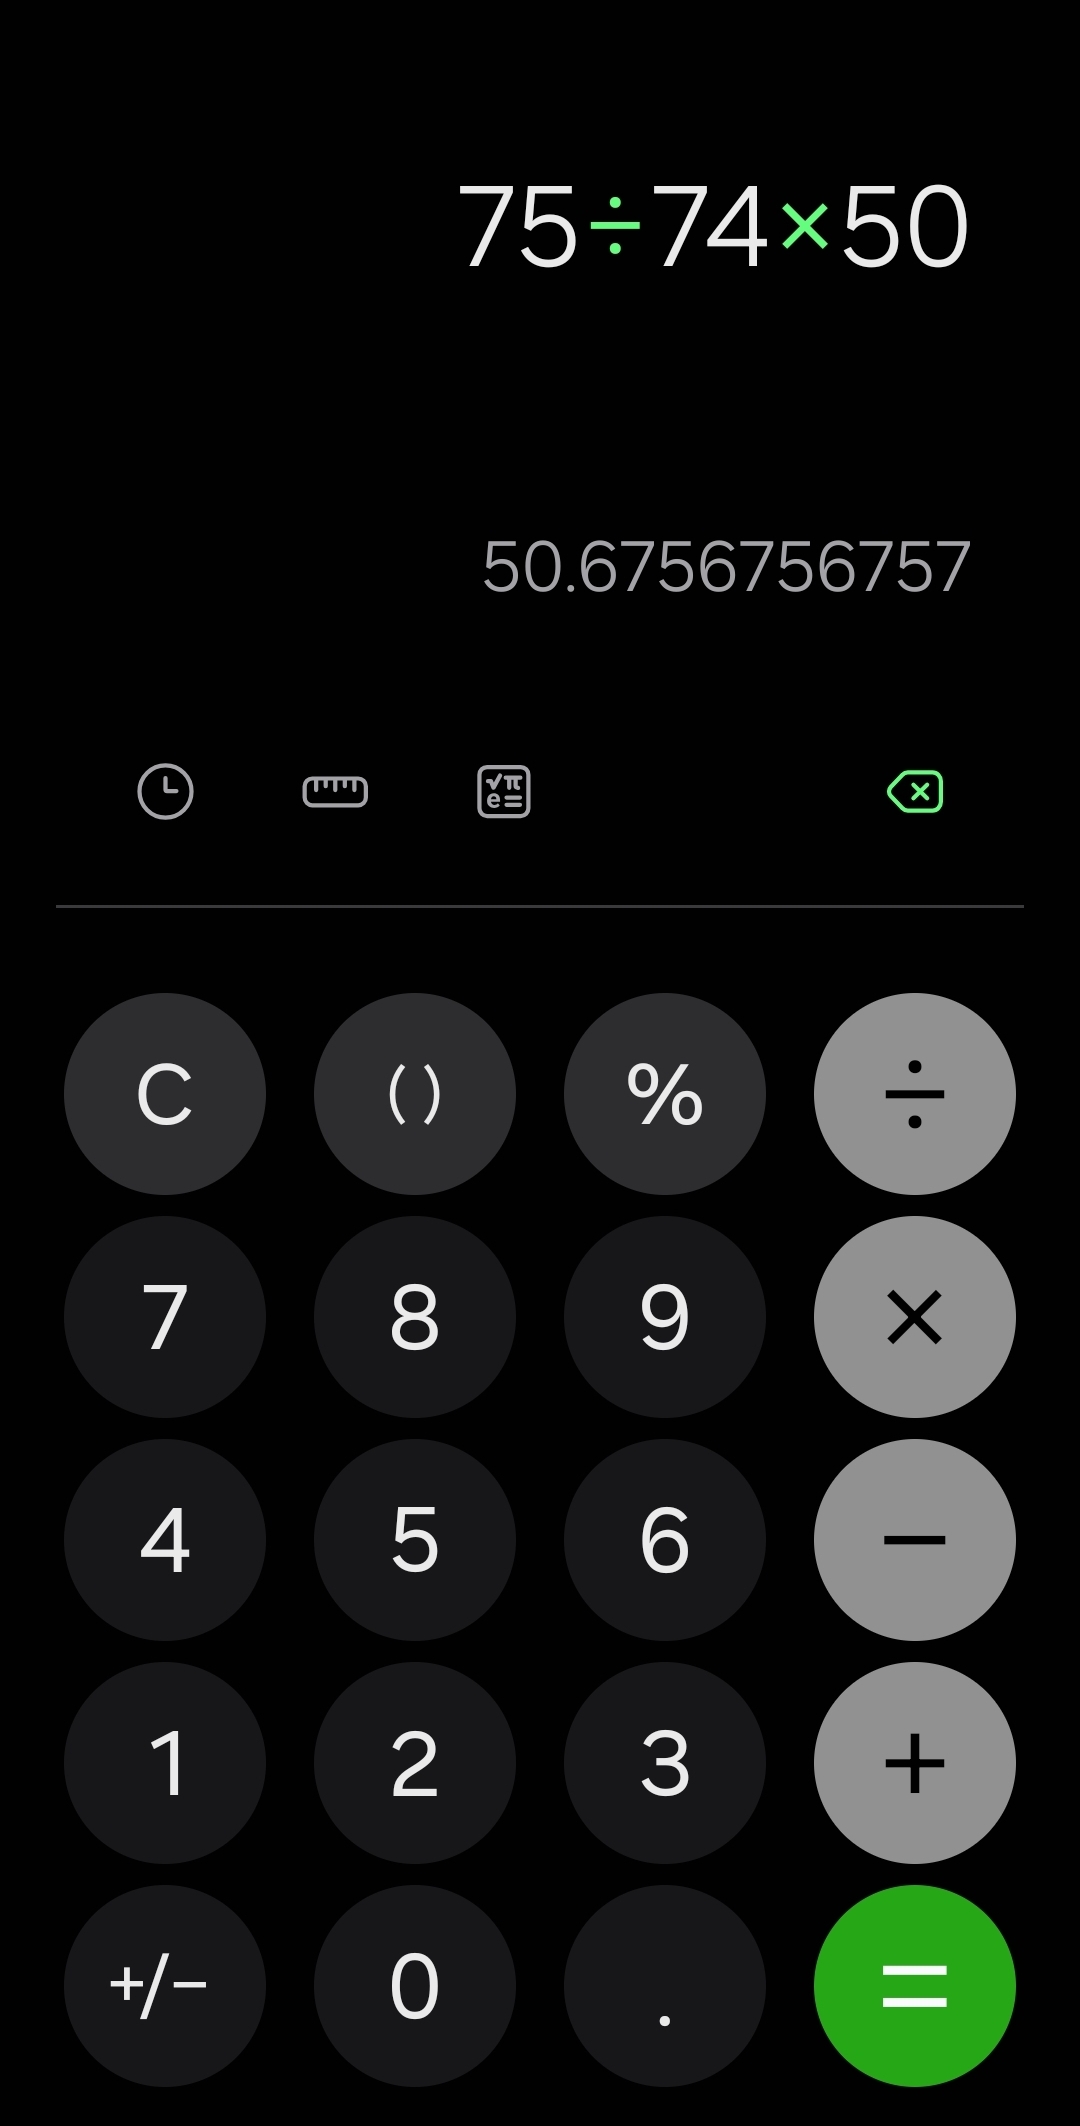
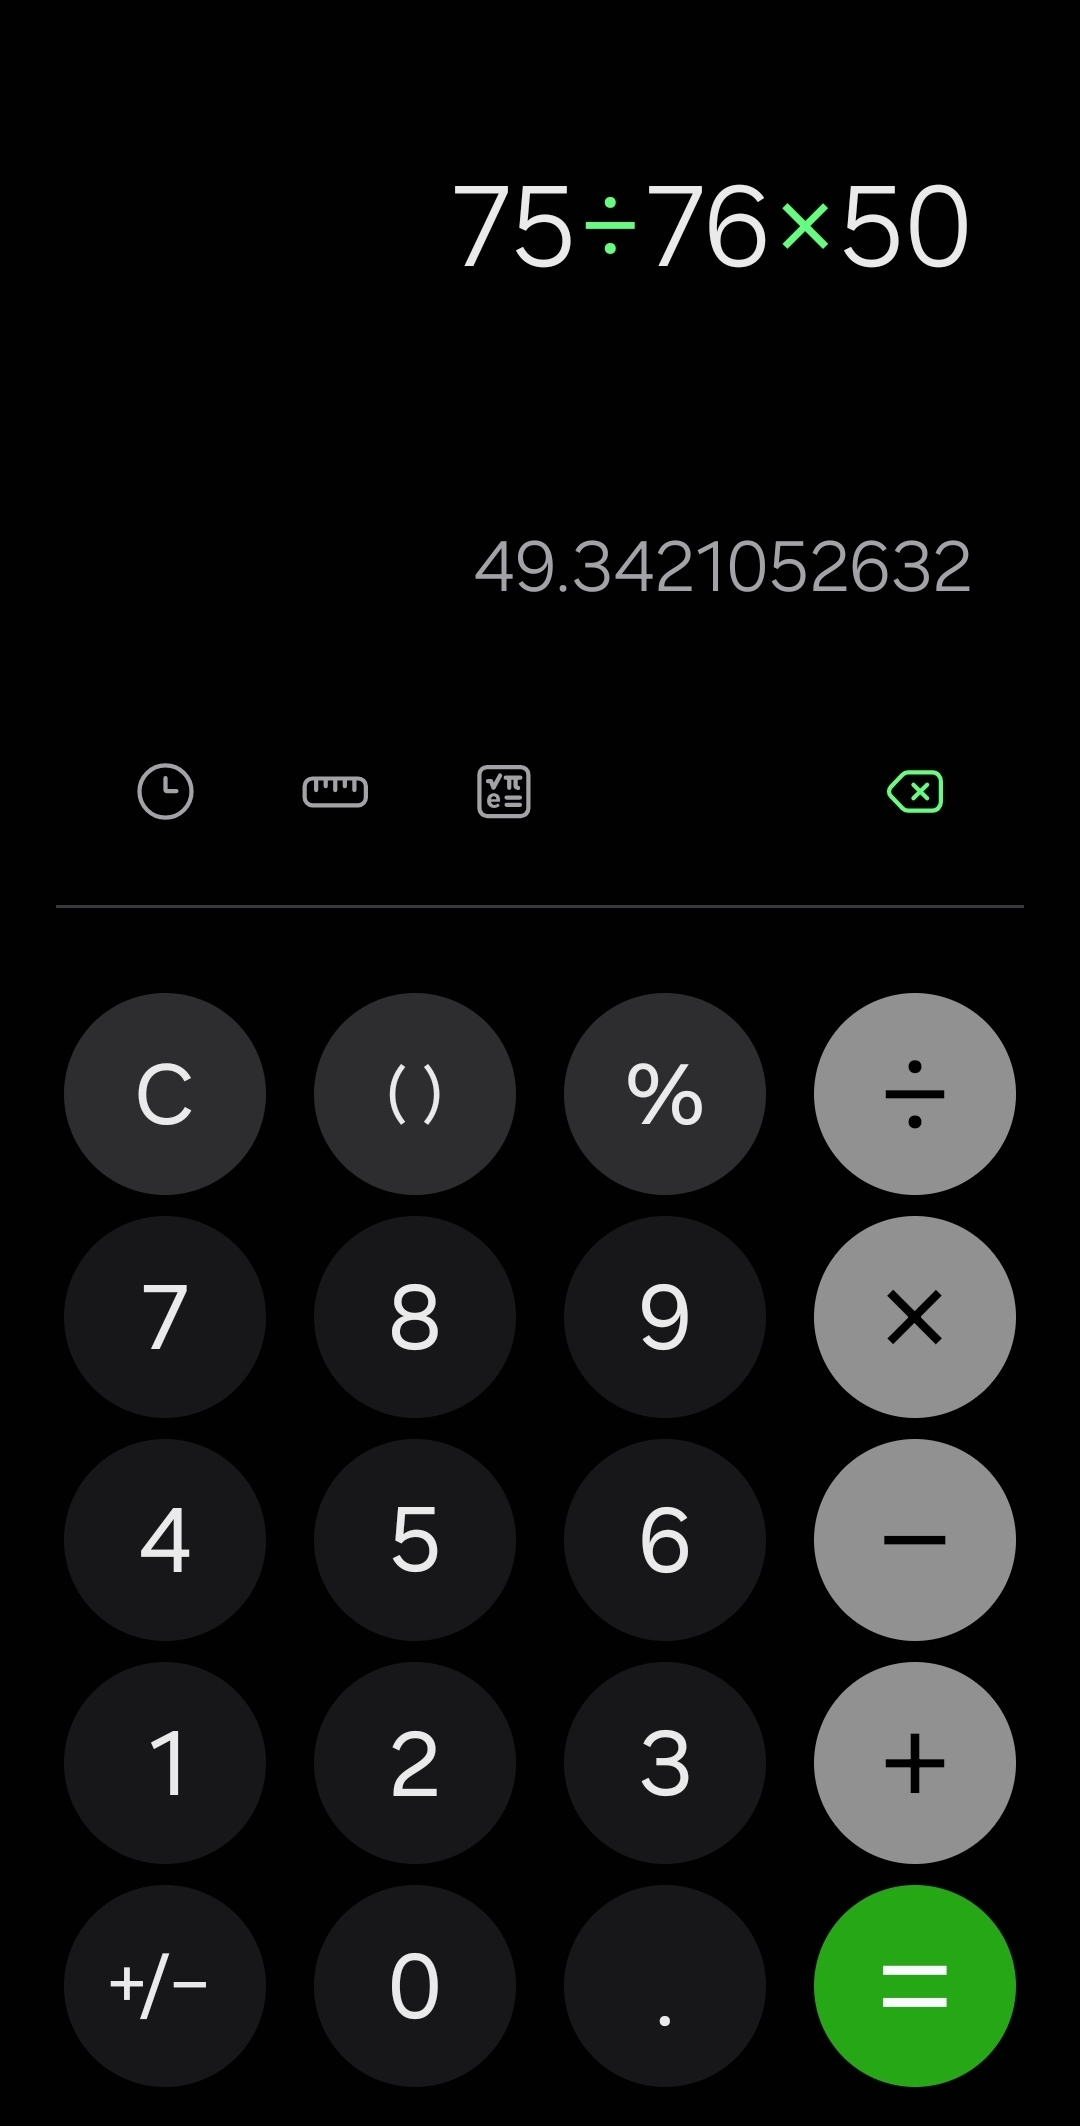
In the examples below, the measured tip voltage is 75 volts.
- In the first example, the voltage divider works correctly, divides the 75 volts by 50, and sends 1.5 volts to the CNC control. The CNC controls multiplies that voltage by 50 and uses 75 volts as the live tip voltage for cut management.
- When the voltage divider is off, it will be off over the entire range of measured tip voltages by the same ratio.
- Measure the actual tip voltage with a multimeter while noting the live voltage reported by the CNC control.
- If the
reportedvaluesvoltagematch, no change isless than the actual tip voltage, then the multiplier will need to be slightly higher than 1 to correct it.Measured raw tip voltage is 75, but the control reports 74. Actual volts / reported volts = voltage multiplier75/74 = 1.0135 to be your voltage multiplier
- If the
reportedvaluesvoltagedoisnotmorematch,thanathesimpleactualmathtip voltage, then the multiplierexercise willneed to be slightly less than 1 tocorrect it. If
Measured Tip Voltage / Live Voltage from the Measuredscreen raw X the current Live Voltage Feedback Multiplier = new Live Voltage Feedback Multiplier
|
In the second example, the voltage divider's resistors are off by a little. It divides the 75 volts and reports 1.48 volts to the CNC control. The control multiplies it by 50 and believes that the live tip voltage is
Update the |
In the third example, the voltage divider's resistors are also off by a little. It divides the 75 volts and reports
Update the Live Voltage Feedback Multiplier to 49.3421 and the Live Voltage on the screen will match the measured tip voltage |
Plasma cut sequence parameters
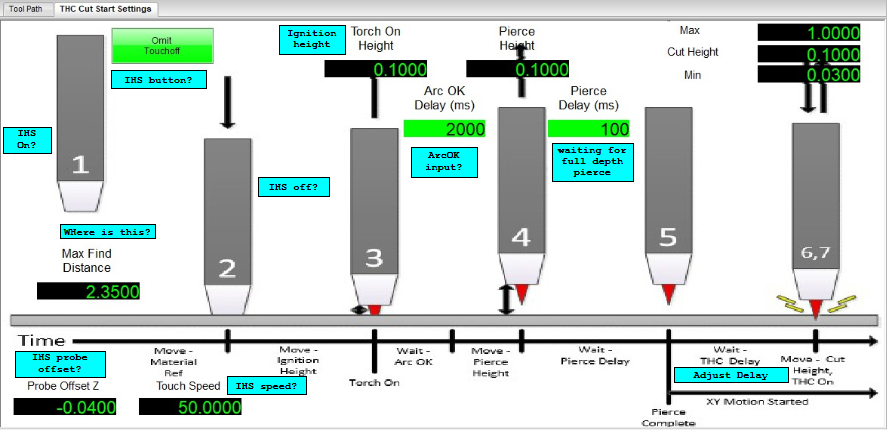
Initial Height Sensing (IHS)
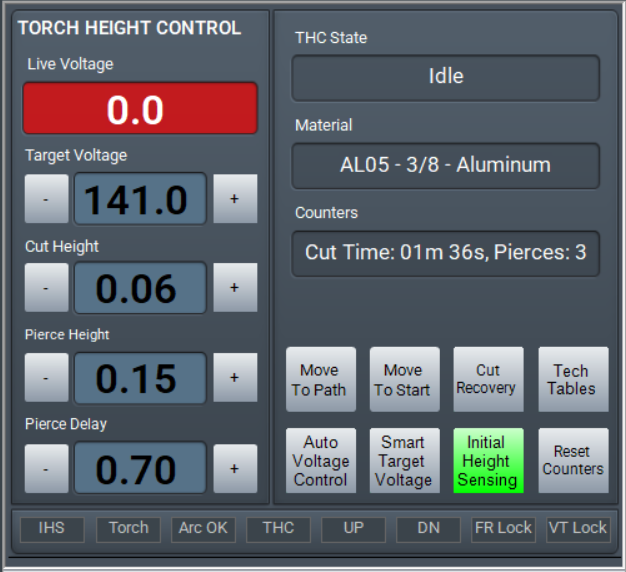
The torch will touch-off the work piece to determine the height for all the following steps.
IHS can be toggled on or off using the button on the lower right of the Torch Height Control section. When it is off, THC will begin without the IHS touch-off.
IHS Probe Offset is the distance between the physical touch-off and when the sensor triggers. Use this to tune the IHS touch-off to accurately report the material work height. Manually jog the torch down to the work piece and note the Z coordinate. Then repeat using IHS touch-off. Enter any difference between your measured Z height and the IHS reported Z height as your IHS Probe Offset.
IHS Skip Distance is used on closely spaced cuts where the initial height of the next cut is already known and a new probe is not needed. This saves cycle time on multiple cuts. Set this distance according to the job needs.
Once the IHS sequence has probed the material, it reports the initial height to the CNC control for the next steps.
Ignition Height is the distance above the work piece to strike the arc. This is set in the Tech Tables.
Arc OK signals the CNC control that the arc has been established and the pierce process can begin. The torch will move up to the Pierce Height and wait for the Pierce Delay.
The Pierce Height is set by the Tech Table to be correct for the material.
Pierce Delay is set by the Tech Table to be correct for the material.
Itis the length of time required for the arc to pierce that type of material based on the other settings in the tech table. Once the Pierce Delay is complete, the torch will begin XY movement.
Torch Height Control (THC) begins with the XY motion, but it can be delayed with the Adjust Delay to allow the arc to stabilize in the material and any initial voltage fluctuations to settle.
ProbingTorch Configuration
Height Control (THC)
ForTHC uses the tip voltage to set the torch height during the cut.
Auto Voltage Control uses a fixed voltage from the tech tables, or as set by the operator to maintain the torch height.
Smart Target Voltage measures the voltage at the beginning of the cut and maintains that voltage level throughout the cut.
Within MachPro, the supported THC systems are the Vital Systems ArcPro Torch Height Control, Plasma Roller Heads, and the SoftHC (software height control).
The ArcPro will manage the incoming voltage signal from the voltage divider and adjust the torch height. Refer to the Vital Systems ArcPro User Guide to integrate your ArcPro into the MachPro prior to version 2026.5.13.1 MachPro Probing Wizardsoftware.
ForThe MachProSoftHC versionsneeds 2026.5.13.1a voltage input from the voltage divider and after
Modifying GoTo Positions
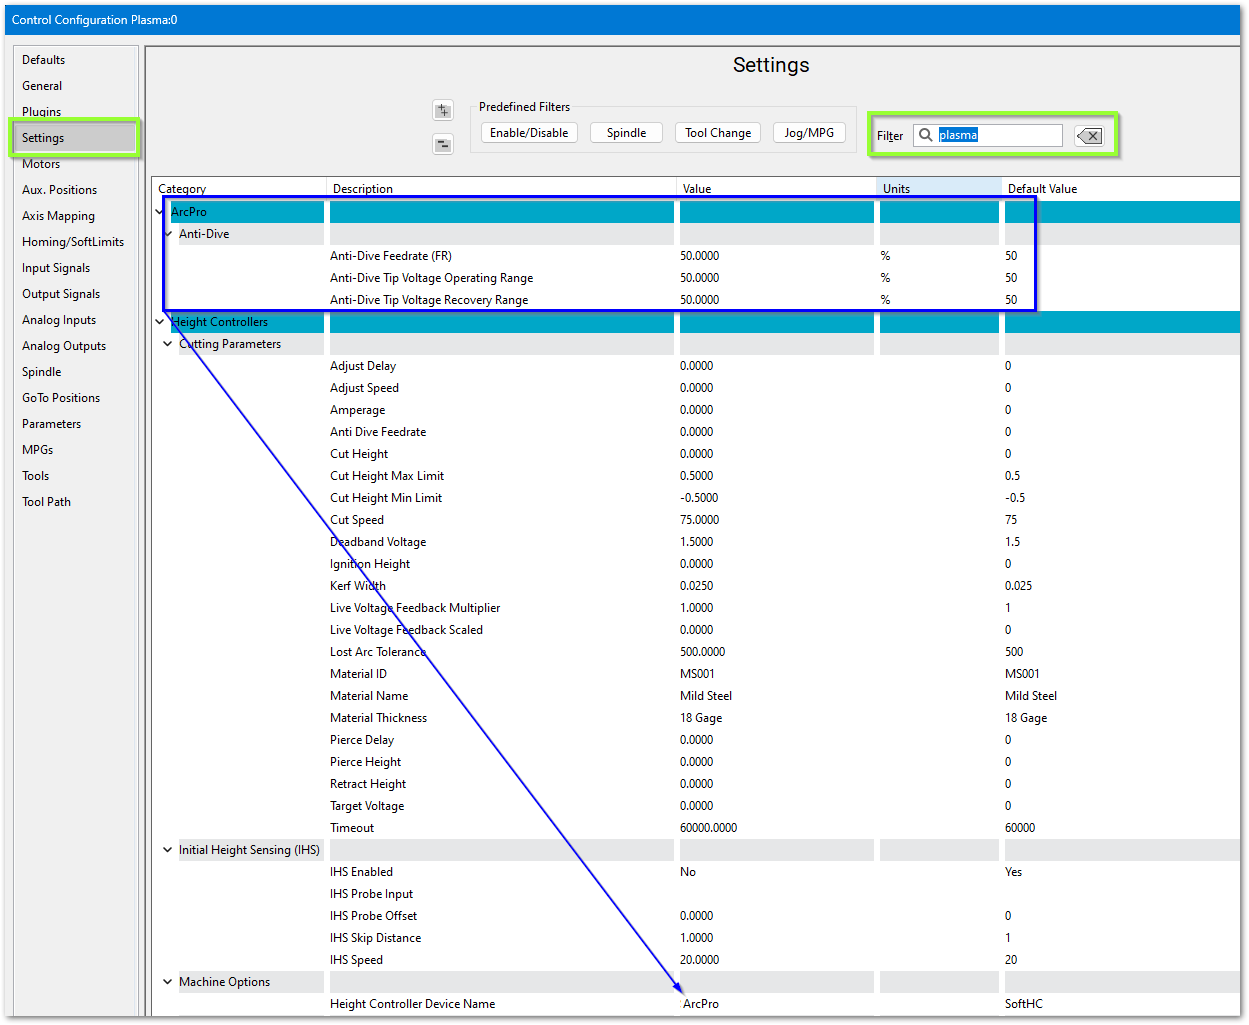
Configure MachPro Plasma
These are the minimum software settings to integrate your power unit with MachPro.
- Pull down Configure -> Control and select the Settings tab
- In the upper right corner of the window, enter plasma as the filter term

ArcPro height controller
Verify these settings
Soft Height Control

Roller Head
If you are using a roller head, change the Plasma Style to Roller Head and update these settings to match your system

Initial Height Sensing (IHS)
This is usually implemented with an ohmic contact, torque/motor-stall sensing, or a floating head switch. These are the options for configuring IHS.

Laser settings

Probing Configuration
For MachPro prior to version 2026.5.13.1 MachPro Probing Wizard
For MachPro versions 2026.5.13.1 and after MachPro Blum Probing Routines
Modifying GoTo Positions
{{@2016}}