
Motion Filter Plugin
Introduction
Overview
The MotionFilter plugin transforms axis positions between the motion planner (the "core") and the physical motors. It lets one axis influence another — gearing a slave to a master, overriding one axis from another, compensating a mechanical squaring error, applying a rotational transform, or correcting a linear taper — without changing the part program. Every transform is applied on the fly as positions stream to the motors and is exactly reversed on the way back so the control always sees a consistent picture.
The plugin is machine-type agnostic. The same features work on mills, lathes, and grinders. Axes are referenced by index (0 = X, 1 = Y, 2 = Z, 3 = A, …), so any pairing that makes physical sense is allowed.
Feature Summary
| Feature | What it does |
| Gearing | A slave axis motor follows a master axis motor at a configurable ratio. The slave’s planner position is untouched; only its motor output is scaled and added. Ratio may be negative to invert direction. |
| Axis Override | Commanded motion on a secondary axis is copied onto a primary axis. Moving the primary directly adds no extra motion. |
| Taper Compensation | A slave axis is corrected as a linear function of a master axis: correction = ratio × (master − pivot). Used to correct an unwanted taper so a nominally straight feature comes out straight. |
| Squaring Compensation | Compensates a mechanical out-of-square error between two axes by moving a following axis as a function of an angled axis. |
| Rotation Filters | Rotational coordinate transforms between axis triplets. |
| Position Logging | High-throughput binary logging of every push/pop stage for offline analysis and diagnostics. |
| Adaptive Path Offset | A bounded, smooth offset along the path normal in X/Y, or along Z, driven by load feedback (spindle load, an axis load, or a register) plus operator bumps, that keeps the tool engaged in the material. Follows corners, arcs and stroke reversals; pre-engages from the last cut's average. |
How It Works
Push / Pop Model
The plugin sits in the position pipeline as a two-way filter:
- Push (planner → motors): transforms commanded positions before they reach the motors.
- Pop (motors → planner): the exact inverse transform, so the core sees positions consistent with what it commanded.
On push, the stages run in order: sync → rotation → gearing → squaring → axis override → taper comp. On pop they run in the reverse order. Because push and pop are exact inverses, enabling or disabling a filter never causes a position jump when the control re-synchronizes.
Push and pop must remain exact inverses. A mismatch shows up as a sudden position jump on the DRO the moment the core re-synchronizes. Every filter caches the value it applied on push and subtracts that same value on pop for this reason.
Smooth Engage / Disengage
Filters that can be turned on or off mid-program (gearing recovery, taper comp) never step an axis. When a correction needs to change, the affected axis is eased from its current value to the new target with a 5th-order S-curve trajectory — zero velocity and zero acceleration at both ends, so there is no audible “bang” and no jerk step.
Taper Compensation
Concept
Taper compensation corrects an unwanted taper. If a part that should be a straight cylinder comes out with a slightly larger diameter at one end — from workhead misalignment, deflection, or wheel wear — taper comp continuously offsets the infeed axis as a function of the traverse axis so the finished feature is straight. The part program stays straight; the control does the correcting.
The correction applied to the slave axis is:
correction = ratio × (master_machine_position − pivot)- Slave — the axis that receives the correction (X, the diameter/infeed axis, on an OD/ID grinder).
- Master — the axis the correction tracks (Z, the traverse axis).
- Ratio (Amount) — slave distance per one unit of master travel. Example:
0.005means X moves 0.005 for every 1.0 of Z travel. - Pivot — the master position where the correction is exactly zero. Set this to where the part was dialed in on size, so that point is left untouched and the rest is corrected around it.
On an OD/ID grinder you configure the X Axis taper comp with its master set to Z. The settings section is named for the slave (corrected) axis. Rule of thumb: the axis you would nudge to fix the diameter is the one you configure.
Pivot Anchoring
The pivot is captured as an absolute machine coordinate the moment comp is engaged and is never recomputed from live positions afterward. This means changing a work offset (G54…G59), re-zeroing, or motor drift while the machine is disabled does not move the pivot. The compensation stays anchored to the physical geometry, which is what keeps the dialed-in end on size.
Each axis has a Pivot Position Coordinate System setting:
- Part — the entered pivot is in part (work) coordinates and is converted to machine coordinates at engage time. On every tool change the pivot is automatically shifted by the new tool offset so it keeps following the part.
- Machine — the entered pivot is an absolute machine coordinate and is used verbatim, never adjusted.
The Arm Switch
Taper Comp Enabled is the overarching arm switch. It must be Yes for compensation to engage. When it is No, the M256 engage command becomes a silent no-op — a posted program still runs, just uncompensated — so the same program is portable to machines that do not use taper comp. Turning comp off (M257) is always honored regardless of the arm switch.
M-Codes
| M-code | Purpose |
| M256 | Engage (or update) taper compensation from the stored settings. Silent no-op when the arm switch is off. Blocks until the correction ramp settles so the next line runs fully compensated. |
| M257 | Disengage taper compensation. Ramps the correction to zero. Always honored. Idempotent. |
M256 optional words:
| Word | Meaning |
| Q | Pair selector: Q1 = X slave, Q2 = Y slave, Q3 = Z slave. Omitted = engage every configured pair. |
| P | Pivot position along the master, in part coordinates. Writes the stored Pivot setting, then engages. |
| R | Amount — slave distance per one unit of master travel. Writes the stored Amount setting, then engages. |
M257 optional word: Q selects a single pair to disengage (Q1/Q2/Q3); omitted disengages all active pairs.
The P and R words persist — they overwrite the stored settings, so a value posted by a program remains the machine’s taper setting after the program ends. Pair topology (which axes are paired) can only be changed in the settings, never from an M-code.
(Engage every configured pair from the stored settings)
M256

(X pair: 0.005 per unit of master, pivot at part zero, then engage)
M256 Q1 R0.005 P0

(Dress cycle choreography: comp off, dress, comp back on)
M257
G261 (dress)
M256

(Disengage all taper comp)
M257
Settings
Taper Comp settings live in the shared Common settings and appear under the Taper Comp category of the MachMotion configuration Parameters tab.
| Setting | Default | Range | Description |
| Taper Comp Enabled | No | Yes / No | Overarching arm switch. Must be Yes for comp to engage. |
| Ramp Speed — Percent | 25 | 1–100 % | Fraction of the slave axis max velocity and acceleration used by the engage / disengage / update ramp. |
| Ramp Minimum Duration | 0.5 | ≥ 0 s | Floor on the ramp duration. Lower it to make small corrections apply faster. |
| X/Y/Z Axis Taper Comp Configured | No | Yes / No | Enables that axis as a taper comp slave. |
| Master Axis That <axis> Follows | — | choice | Which of the other two axes is the master for this slave. |
| <axis> Distance Per One Unit Of Master Travel | 0 | float | The Amount (ratio). Signed. |
| Pivot — Position Along Master Where Correction Is Zero | 0 | float | The pivot position. |
| Pivot Position Coordinate System | Part | Part / Machine | Whether the pivot is part or machine coordinates (see Pivot Anchoring). |
Ramp Speed
The two ramp settings control different regimes of the same S-curve. For a given correction distance, the planner picks the shortest duration that respects all three limits: percent of max velocity, percent of max acceleration, and the minimum-duration floor.
- Ramp Speed Percent dominates large corrections — raise it toward 100 to apply big changes faster.
- Ramp Minimum Duration dominates small corrections — a tiny correction would otherwise apply almost instantly, so the floor keeps it smooth. Lower it toward zero to make small corrections snap in.
The ramp is always a quintic (5th-order) S-curve, so jerk is finite and continuous no matter how the two settings are chosen — there is no bang even at 100 % / 0 s.
Screen Controls
Four operator commands are available (assign them to buttons in the screen designer):
| Command | Action |
| Taper Comp Arm Toggle | Flips the arm switch. Disarming also disengages any active comp. Button LED reflects the armed state. |
| Taper Comp Adjust | Opens the adjust dialog (below). |
| Taper Comp On | Engages every configured pair from the stored settings. |
| Taper Comp Off | Disengages all pairs. |
The Taper Comp Adjust dialog shows the armed state, the active pair, and a live applied-correction readout with a color-coded state indicator (OFF / RAMPING / ACTIVE). The taper amount can be entered three ways — distance per unit, angle in degrees, or measured deviation over a length — and the resulting per-unit value is shown as you type. The pivot can be typed or captured from the current master position with Use Current. A Turn Comp On / Off button engages or disengages with exactly what the dialog shows; OK saves the settings (and ramps an update into an already-running comp).
If the Applied Correction reads 0 while the state shows ACTIVE, the master is simply sitting at the pivot — correction there is zero by definition. Jog the master away from the pivot and the applied value grows with distance.
Dressing Interaction
Dressing must run with comp off so the wheel is dressed straight (dresser positions are machine coordinates and would otherwise produce a tapered wheel). The wizard-posted program choreography is M257 before the dress cycle and M256 after it.
Adaptive Path Offset
Concept
Adaptive Path Offset adds a small, bounded offset to the programmed path so the tool is pushed into (or backed away from) the material without changing the part program. It was built for stone countertop polishing, where the programmed path is deliberately under-engaged and a spindle-load loop adds engagement until the load reaches a target, but the mechanism is generic: any process that wants a load-driven or operator-driven offset along the path normal can use it.
In XY mode the offset is applied perpendicular to the direction of the cut, on the side where the material is. In Z mode it is applied straight down into the material. The offset is a process-space correction, so it is applied before the machine-geometry stages (rotation, gearing, squaring, taper) and reversed exactly on the way back: the DROs keep showing the programmed path, and the offset survives mcMotionSync and disable / enable like every other stage.
Every change of the offset — turning on or off, the load loop, Engage In / Retract Out, the normal turning through a corner, a side change — goes through velocity- and acceleration-limited followers and a smoothing window, so the tool never steps. Turning off ramps the offset back to zero before the next programmed move.
Direction of Travel and the Offset Side
While the feature is enabled the plugin tracks the direction of travel from the motion points it is already receiving, even when the offset is off. The last direction of any motion and the last direction of feed motion are both published, so the side the offset will go to is known before it is turned on. The normal is always perpendicular to the current cut direction (rapids and jogs are ignored), it follows arcs and corners, and it holds through a reversal: on back-and-forth strokes along one edge the offset stays on the same physical side of the part.
The side is named as in cutter compensation, looking down with Z up and facing the direction of travel: 1 = G41: the tool runs on the left of the programmed path, so the material is on the right and the offset pushes to the right of travel; 2 = G42: the tool runs on the right, the offset pushes to the left. It is chosen once, at turn-on (M275 Q1 / Q2, the NormalSide setting, or the tuning page); after that the plugin keeps the material on that side. Changing the side while on ramps the offset out, flips, and ramps back in. For sanding or polishing with the Z axis, M275 Q3 (Z down) or Q4 (Z up) puts the offset along Z instead; without a Q word the Mode and ZDownIsPositive settings apply.
| Contour | Program direction (from above) | Side |
| Outside perimeter | clockwise | Q1 (G41: material on the right, offset pushes right) |
| Outside perimeter | counterclockwise | Q2 (G42: material on the left, offset pushes left) |
| Sink cutout, inside | clockwise | Q2 (G42: material on the left) |
| Sink cutout, inside | counterclockwise | Q1 (G41: material on the right) |
Offset along the Z axis
For sanding or polishing a surface with the Z axis the offset is along Z instead of along the path normal: M275 Q3 engages downward (the tool is pressed into the surface below it) and M275 Q4 engages upward (the tool is pressed against a surface above it). There is no left or right in this mode, and the direction of travel in X/Y does not matter; the load loop, Engage In / Retract Out, the average engagement and the protection work exactly as in X/Y. Without a Q word the Mode setting selects X/Y or Z and ZDownIsPositive gives the sense. The Z limits are separate: MaxEngageZ / MaxRetractZ bound how far the offset may go in or out, and the soft limits of the Z axis still apply. With a Z axis load available from the drive, L3 makes the loop regulate on it (see Load Loop below).
| Q word | Mode | Offset direction |
| Q1 | X/Y | G41: tool on the left of the path, offset pushes to the right of travel; follows the path normal |
| Q2 | X/Y | G42: tool on the right of the path, offset pushes to the left of travel; follows the path normal |
| Q3 | Z | Z down: engagement pushes the tool down into the surface |
| Q4 | Z | Z up: engagement lifts the tool against a surface above |
| omitted | setting | Mode, NormalSide and ZDownIsPositive settings (unchanged when already on) |
Load Loop, Manual Bumps and Pre-engagement
The load loop reads the load feedback (the LoadSource setting, or M275 L for one cut): the spindle load (mcSpindleGetLoadPct, published by the motion controller), the plugin register PathOffset_LoadInput for an external sensor, the Z axis load (mcAxisGetLoadPct; pressing down with the Z axis), or the X and Y axis loads averaged with weights from the offset direction (the axis pushing into the part carries the engagement force). It filters the value, and runs a PI(D) controller against the target. Inside the Load Tolerance band the loop holds. The loop keeps running through feed hold and feed override at zero, which can be used to dial in engagement with the tool stationary. Load control can be switched off to use the feature with manual offsets only.
Engage In and Retract Out bump the offset immediately by the Manual Increment; nothing is stored, the loop relaxes or engages further from there. M275 E starts a cut pre-engaged by a given amount. The average achieved engagement of each cut is published in PathOffset_AvgEngagement when the cut ends (M276, a cycle stop or a fault), so it can be stored in the tool table and handed back as E on the next cut with that tool.
M-Codes
| M-code | Purpose |
| M275 | Adaptive Path Offset on. E starting engagement (units; 0 / omitted = nominal path), T target load in percent (omitted = unchanged), Q direction as cutter comp: Q1 = G41 (offset pushes right of travel), Q2 = G42 (offset pushes left) in X/Y; Q3 Z down, Q4 Z up along the Z axis (omitted = Mode and NormalSide settings). L load feedback for the cut: L1 spindle load, L2 register PathOffset_LoadInput, L3 Z axis load, L4 X/Y axis load (omitted = LoadSource setting). |
| M276 | Adaptive Path Offset off. Ramps to zero and waits. V optional pound variable that receives the cut's average engagement. |
M238 V551 (Data:"AvgEngagement")     (last average for this tool, from the tool table)
M275 E#551 T65 Q1                    (on: pre-engage by it, target 65 %, G41: material on the right)
G1 X... Y... F...                    (the polishing passes)
M276 V550                            (off; #550 = average engagement of this cut)
M239 T#550 (Data:"AvgEngagement")    (store it for next time)

M275 T40 Q3 L3                       (Z sanding: press down with Z, Z axis load, target 40 %)
G1 X... Y... F...
M276
Settings
Every setting is at once a numeric register MotionFilter/PathOffset_<Key> that screens and scripts may write, a profile item in the [PathOffset] section, and a change that applies to the running stage immediately (same mechanism as the MachMotion plugin’s settings). The settings are split by who changes them: the configuration dialog (Configure > Plugins > Motion Filter) holds the feature enable and the machine setup that is decided once; the diagnostics Adaptive Path page holds everything that is tuned on the part while running. Any of them can also be written as a register, for example M243 T65 (Data:"MotionFilter/PathOffset_TargetLoad").
Configuration dialog
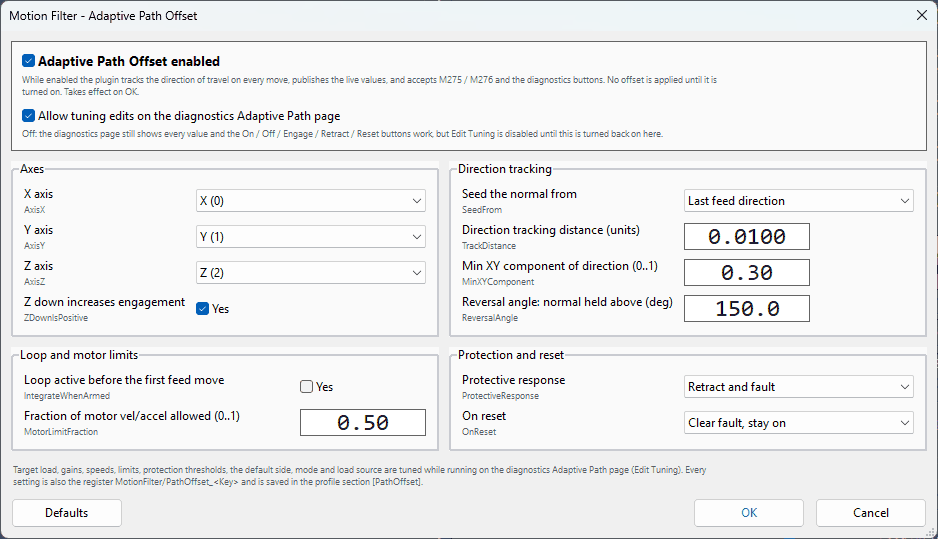
OK applies the changed values and saves the profile; Defaults loads the factory values into the fields without applying them; Cancel discards. These settings are not on the diagnostics page.
| Setting (register key) | Default | What it does and how to set it |
Adaptive Path Offset enabledEnabled |
off | Installs the feature. While enabled the plugin tracks the direction of travel on every move, publishes the live registers, and accepts M275 / M276 and the diagnostics buttons. No offset is applied until it is turned on. Leave it off on machines that do not use the feature; it is the only setting that is not on the diagnostics page or writable as a tuning value. |
Allow tuning edits on the diagnostics pageAllowDiagnosticsEdit |
on | Who may tune. Off: the diagnostics Adaptive Path page still shows every value and its On / Off / Engage In / Retract Out / Reset Fault buttons work, but Edit Tuning is disabled and the legend reads "view only". Turn it off once a process is tuned so an operator cannot change the loop; turn it on here to tune again. Takes effect on the open page without reopening it. |
X axis / Y axis / Z axisAxisX AxisY AxisZ |
X / Y / Z | Which Mach axes the stage treats as the plane of the cut (X, Y) and the depth axis (Z). Change only on machines whose polishing plane is not X/Y. The three must be different; the dialog refuses duplicates. Changing them reloads the motor limits. |
OB axis that drives the offset / OB axis scaleObAxis ObScale |
OB1 / 1.0 | Only used when What drives the offset is set to OB axis position: which OB axis (OB1 to OB6) is the offset amount, and how many offset units one unit of that axis is worth (negative inverts). See OB-Axis Mode. |
Z down increases engagementZDownIsPositive |
yes | The default sense of a Z-mode cut: with yes, more engagement moves the tool in the negative Z direction (pressing down onto a surface). Set no for a tool that presses upward. M275 Q3 (Z down) and Q4 (Z up) override it for one cut. |
Seed the normal fromSeedFrom |
last feed direction | Where the offset direction comes from at turn-on. Last feed direction uses the direction of the last G1/G2/G3 move, so rapids to the start point do not matter; use it unless the program starts the cut immediately after a rapid in the cutting direction, in which case last direction of any motion also works. |
Direction tracking distanceTrackDistance |
0.010 units | How far the tool has to travel before the tracked heading moves, like the length of a trailing arm. Larger values give a steadier heading on noisy or short-segment paths but lag further behind in tight corners; smaller values follow tight arcs more closely. 0.005 to 0.020 covers most machines; keep it well below the smallest arc radius you polish. |
Min XY component of directionMinXYComponent |
0.30 | The share (0..1) of a move that must be in X/Y for it to update the heading. Moves that are mostly Z (plunges, lifts) are ignored so they cannot swing the normal. Lower it only if you polish steep 3D surfaces where real cuts have a large Z component. |
Reversal angleReversalAngle |
150 deg | A heading change larger than this is treated as a stroke reversal (back and forth along the same edge): the normal is held so the material stays on the same side of the part instead of flipping. Below this angle the normal turns with the path (corners, arcs). Lower it only if your reversals are not close to 180 degrees. |
What drives the offsetLoadControl |
on, load loop | Off: no load loop and no load protection; the offset is only what you set (pre-engagement plus Engage In / Retract Out). Use off to find the right engagement by hand, then turn it on with the target set to the load you saw. OB axis position: the offset amount is an OB axis you jog, see OB-Axis Mode. |
Load source (M275 without L)LoadSource |
spindle load | Where the loop reads its feedback: the spindle load from the motion controller, the register PathOffset_LoadInput written by another plugin or script, the Z axis load, or the X/Y axis load weighted by the offset direction. Use the axis loads when the spindle is a constant-speed polishing head whose load does not change with pressure. M275 L1..4 overrides it for one cut. |
Load stale timeoutSignalTimeoutMs |
2000 ms | Protection: a load value that has not changed at all for this long while the spindle runs is treated as a lost signal (a frozen VFD link or register). 0 turns it off. Do not set it below the update period of the load source. |
Loop active before the first feed moveIntegrateWhenArmed |
no | With no, the load loop waits for the first feed move after turn-on (the Armed state) so it cannot wind up while the tool is still in the air. Set yes only when the tool is already in contact when M275 runs, for example a Z-mode cut that starts pressed on the surface. |
Fraction of motor velocity / acceleration allowedMotorLimitFraction |
0.50 | Caps the offset speed and acceleration at this fraction of the slowest involved motor’s limits, whatever the tuning values say. Protects the drives if a speed is typed too high. Lower it on machines with weak axes; raise it only if the motion settings below are genuinely limited by it. |
Protective responseProtectiveResponse |
retract and fault | What a protection trip (max load, min RPM, stale or invalid load) does. Retract and fault ramps the offset to zero and latches the fault; the program keeps running on the nominal path. Retract, fault and feed hold also stops the program so the operator can look. Use feed hold on fragile parts. |
On resetOnReset |
clear fault, stay on | What Reset Fault (or a control reset) leaves behind. Clear fault, stay on returns to the On state and the loop resumes from the next feed move. Turn off leaves the feature off so the operator must issue M275 again. |
Tuning on the diagnostics Adaptive Path page
The Tuning section at the bottom of the page (see the screenshot under Diagnostics Page) is locked until Edit Tuning is pressed, so a stray click cannot change a running loop. Once unlocked, each field applies the moment you press Enter or leave it, and is saved to the profile; Lock Tuning locks the fields again. If the legend reads view only, editing has been turned off in the configuration dialog. The register key of every field is shown under its label.
Load loop
| Setting (register key) | Default | What it does and how to set it |
Target loadTargetLoad |
65 % | The load the loop holds, in the units of the load source (percent for the spindle and axis loads). Find it empirically: with load control off, use Engage In until the finish is what you want and read the load in the Load tile; that value is the target. M275 T sets it per cut. |
ToleranceLoadTolerance |
2.00 % | Band around the target in which the loop holds the offset still. Wider bands give a quieter tool at the cost of a less constant load; narrower bands react to every ripple. Start at about 3 % of the target and narrow it once the gains are set. |
Load filterLoadFilterMs |
200 ms | Low-pass filter on the load reading before the loop sees it. Raise it if the Load tile is noisy or the offset chatters; lower it if the loop reacts too late at the start of a stroke. Spindle loads from a VFD typically need 100 to 300 ms. |
KpKp |
0.000500 units/% | Proportional gain: offset change per percent of load error. Tune first with Ki and Kd at 0: raise it until the offset follows load changes promptly, then back off when it starts to hunt. A gain of 0.0005 moves 0.005 units for a 10 % error. |
KiKi |
0.001000 units/(%·s) | Integral gain: removes the steady error that Kp alone leaves. Add it after Kp; too much causes a slow swing around the target. The integral is bounded by the integral limit and is not accumulated inside the tolerance band or while retracting. |
KdKd |
0 units/(%/s) | Derivative gain on the rate of load change. Usually left at 0; a small value can damp hunting on a lightly filtered, clean load signal. It amplifies noise, so raise the load filter with it. |
Integral limitIntegralLimit |
0.1000 units | Cap on the integral term, so the loop cannot wind up to the engagement limit while the tool is off the part. Set it to the largest engagement the loop should ever have to add by itself, typically half of Max engage. |
Max loop ratePidMaxRate |
5.000 units/min | Fastest the loop part of the offset may change. It keeps load noise out of the motion and decides how quickly the tool can push in when the load drops at a corner. Raise it if the loop is sluggish at stroke starts; lower it if the finish shows ripples that follow the load. |
Control periodControlPeriodMs |
20 ms | How often the loop runs. 10 to 50 ms is sensible; faster than the load source updates (RMP publishes the spindle load every few ms, a PLC register maybe every 50 ms) gains nothing. |
Motion
| Setting (register key) | Default | What it does and how to set it |
Engage speedEngageSpeed |
10.000 units/min | Speed of the offset toward the part (initial engagement, Engage In, loop increases). Slow enough that the tool loads up smoothly; the pre-engagement from M275 E is applied at this speed on the first feed move. |
Retract speedRetractSpeed |
20.000 units/min | Speed of the offset away from the part (Off, Retract Out, protective retracts, loop decreases). Usually faster than engage so a load spike is relieved quickly. |
Sweep speed, cornersSweepSpeed |
20.000 units/min | Fastest the applied offset vector may move as the normal turns through a corner or arc. Lower it to round the sweep on tight corners; it also sets the soft-limit margin shown on the page (stopping distance plus 0.010). |
Max accelerationMaxAccel |
2.000 units/s² | Acceleration limit for every offset motion, bounded further by the motor limit fraction. Lower values are gentler on the surface and the drives; the tool never jumps, whatever is typed here. |
Smoothing windowSmoothTimeMs |
40 ms | Moving-average window applied to the final offset; it bounds the jerk (about Max acceleration divided by the window). Raise it if the drives complain at offset starts; it adds that much lag to every offset change. |
Max engage XY / Max retract XYMaxEngageXY MaxRetractXY |
0.1000 / 0.0250 units | Hard limits on the offset in X/Y mode, into and away from the part. The loop, the bumps and M275 E are all clamped here. Set Max engage a little above the largest engagement a worn tool needs; Max retract covers backing off a part that stands proud. |
Max engage Z / Max retract ZMaxEngageZ MaxRetractZ |
0.0500 / 0.0250 units | The same limits for Z mode (Mode = Z or M275 Q3 / Q4). The Z axis soft limits still apply on top. |
Direction and protection
What drives the offset, the load source and the load stale timeout are installation settings and live in the configuration dialog (Load source and loop section), not here.
| Setting (register key) | Default | What it does and how to set it |
Offset side (M275 without Q)NormalSide |
G42 | Default side for X/Y cuts when M275 has no Q word, named as cutter compensation: G41 = tool left of the path, offset pushes right of travel; G42 = tool right, offset pushes left (see the table above). Changing it while on ramps the offset out, flips, and ramps back in. |
Mode (M275 without Q)Mode |
XY, along the path normal | Default direction family: along the path normal in X/Y, or along the Z axis. M275 Q1 / Q2 select X/Y and Q3 / Q4 select Z for one cut without changing this. |
| ||
| | |
Engage In / Out bumpManualIncrement |
0.0050 units | How far each press of Engage In or Retract Out moves the loop offset. Nothing is stored: the loop relaxes or engages further from there. Use a value the finish can tolerate in one step. |
Max load, retract aboveMaxLoad |
95.0 % | Protection: a filtered load above this triggers the protective response. 0 turns it off. Set it where the tool or spindle is at risk, well above the target plus the tolerance. |
Min spindle RPMMinRPM |
0 | Protection: with the spindle on and the true RPM below this, the protective response triggers (a stalled or stopped head). 0 turns it off; set it a little below the running speed of the polishing head. |
|
A tuning procedure
- In the configuration dialog set the axes and the Z sense, enable the feature, and restart or reload. Leave Allow tuning edits on.
- On the diagnostics page set Load control to off and the engagement limits to safe values. Run the polishing program with
M275, and use Engage In / Retract Out until the finish is right. Read the load in the Load tile: that is your target. - Set Target load to that value and the tolerance to about 3 % of it. Set Kp to a small value (the default is a good start), Ki and Kd to 0, and turn Load control on.
- Raise Kp until the Engagement tile follows load changes promptly, then back off until it no longer hunts. Add Ki until the load settles on the target between strokes. Raise the load filter if the offset chatters; lower Max loop rate if the finish shows ripples that follow the load.
- Set Max engage just above the engagement a worn tool needs, Max load where the tool is at risk, and the stale timeout a little above the load source’s update period.
- Store the average engagement of each cut in the tool table (
M276 VthenM239) and hand it back asM275 Eon the next cut, so every cut starts already engaged. Then turn Allow tuning edits off in the configuration dialog.
Tuning advisor
The Tuning advisor tab of the Tuning section on the diagnostics Adaptive Path page does steps 3 and 4 of the procedure from real data. While the feature is in the Running state the plugin records every control tick (time, target, raw and filtered load, achieved engagement, loop output, and whether the loop output was clipped by the max loop rate) into a rolling buffer of the last three minutes of cutting; nothing is recorded while idle, armed or retracting. Cut data recorded shows how much is there (register PathOffset_TuneDataSeconds). Cut for at least ten seconds with the feature on, then press Analyze cut data; opening the tab with a cut already recorded analyses it at once. Until there is a result the boxes show a dash.
| Measured | How |
| Process gain (% load per unit) | How much the load changes per unit of engagement: the slope of load against engagement at the best-fitting lag (cross-correlation of the two traces with the slow drift removed). The correlation coefficient is shown beside it; below 0.3 the advisor will not suggest, and a negative gain means the offset is going the wrong way (check the side or the Z sense). |
| Loop delay (s) | The lag at which engagement and load line up best. It includes the load filter, the load source’s own reporting delay and the offset motion, which is why it is the number that limits how fast the loop may be. |
| Load noise (%) | Scatter of the raw load around a 0.1 s average. Sets the suggested filter and tolerance. |
| Oscillation | Period and amplitude of the first autocorrelation peak of the load, when there is one. |
| Output at rate limit (%) | Fraction of the loop-active time the loop output was clipped by Max loop rate. A high value with a triangle-shaped engagement trace means the gains are asking for more than the offset can do. |
From those it suggests Kp = 0.2 / gain (an open-loop gain of 0.2), Ki = 0.5 / (gain × delay) (about 60 degrees of phase margin for the measured delay), Kd = 0, a load filter and tolerance from the noise, and a max loop rate that lets Ki work at a 20 % error without being clipped (never above the engage speed). The notes line says what is wrong with the current tune (Kp too high for the measured gain, output at the rate limit, oscillating, Ki too high for the delay) or that it is within range. Apply suggestions writes the six values to the tuning settings; it is only enabled when the configuration allows tuning edits. Clear cut data forgets the recording, for example before analysing a different tool or stone. The advisor never moves the tool: it only reads what the cut produced.
Tips: the engagement has to move for the gain to be measurable, so if the loop is already holding the load steady, give it a few Engage In / Retract Out bumps during the cut or analyse a cut made with load control off and manual bumps. After applying, cut again and analyse again; the notes should read “within range” and the suggestions should change little. The result is also available to Lua as a table (mf.PathOffsetAnalyze()) and as the command Path Offset Analyze.
Status Registers and IOs
Status registers are input type (polled); the IOs are input type as well. All live on the MotionFilter device with the PathOffset_ prefix.
| Register / IO | Meaning |
| Enabled, On, Running, AtSoftLimit, Fault (IOs) | Feature enabled; offset applied; on a feed move; offset clamped at an axis soft limit; fault latched. |
| State | 0 disabled, 1 idle, 2 armed, 3 running, 4 hold (rapid/jog points), 5 retracting, 6 fault. |
| FaultCode | 1 max load, 2 min RPM, 3 load stale, 4 load invalid. Reset Fault clears it; the feature is then off. |
| DirX/Y/Z, FeedDirX/Y/Z | Unit direction of the last motion / the last feed motion. |
| NormalX/Y | The offset direction (seeded while on; a preview from the side setting while off). |
| LoadRaw, LoadFiltered, LoadTarget | Load as read, as used by the loop, and the setpoint (%). |
| LoadInput | Writable: external load feedback used when the load source is the register (LoadSource = 2 or M275 L2). |
| RequestedOffset, AchievedOffset, PidOffset | Requested engagement, smoothed achieved engagement, and the loop's part of it (units). |
| AppliedX/Y/Z | What is added to each axis command right now. |
| AvgEngagement, AvgEngagementLive | Average achieved engagement of the last completed cut, and of the current cut so far. |
Diagnostics Page
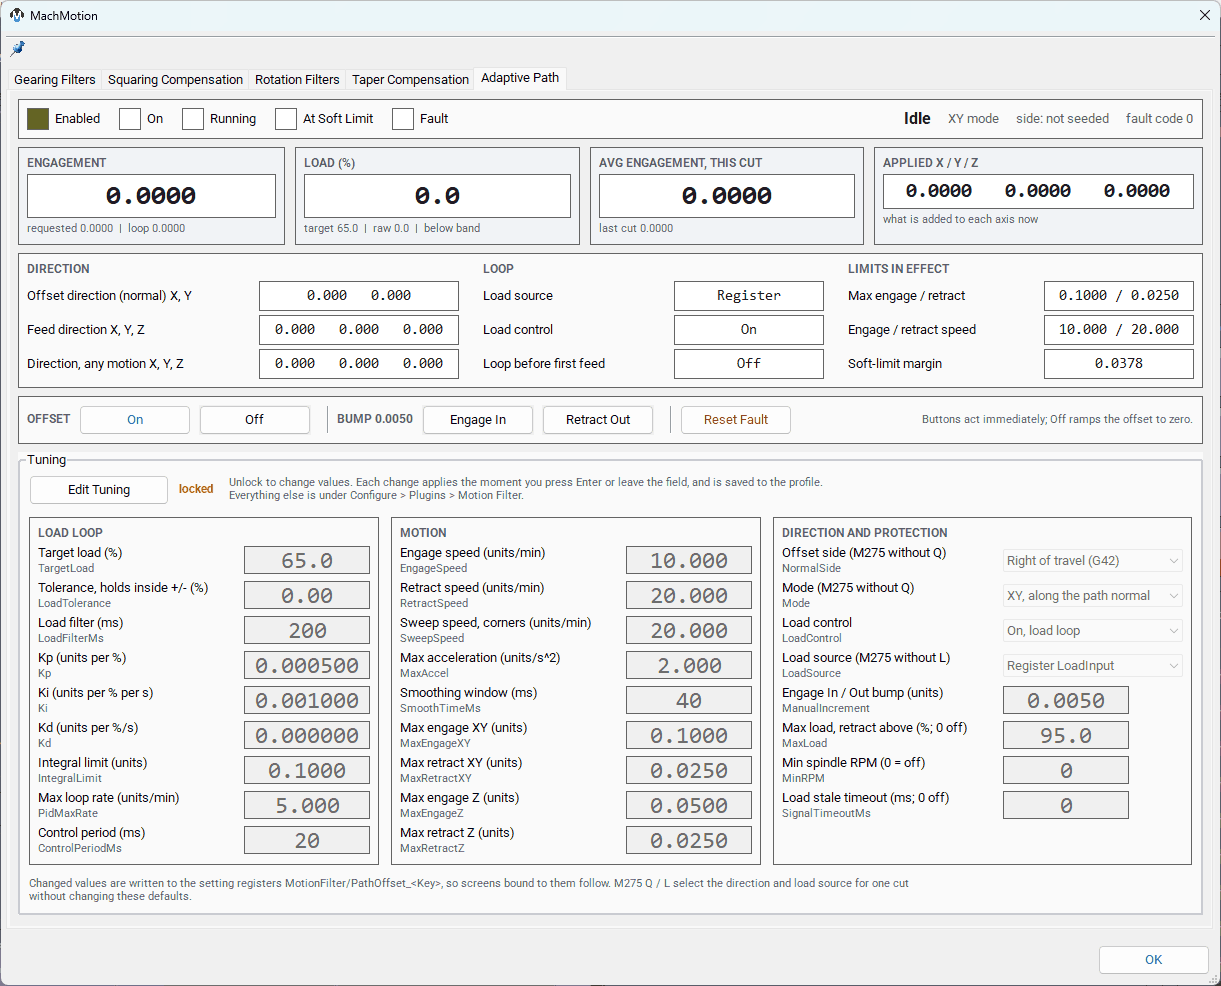
The Motion Filter diagnostics window has an Adaptive Path page for the feature. A status strip shows the LEDs and the state in words (state, XY or Z mode, which side of travel, and any fault with its meaning). Under the strip a rolling graph shows the last minute: the target (dashed blue) and the live load (green) against the left axis, and the engagement (orange) against its own right axis. Four tiles show the numbers an operator watches: the engagement (with the requested and loop values), the load against its target and tolerance band, the average engagement of this cut and the last cut, and what is applied to X, Y and Z. Below them are the offset and travel directions, the loop settings in effect (load source, load control) and the limits in effect, then the On, Off, Engage In, Retract Out and Reset Fault buttons. Below that is the Tuning section with two tabs, Manual tuning and Tuning advisor: the tunable settings in three columns (load loop; motion; direction and protection, including the default side, mode and load source used when M275 gives no Q or L word), or the tuning advisor described below. They are locked until Edit Tuning is pressed, so a stray click cannot change a running loop; once unlocked, each edit applies the moment you press Enter or leave the field and is saved to the profile. Press Lock Tuning to lock the fields again.
OB-Axis Mode: Jogging the Offset
For out-of-band jogging perpendicular to the tool path (the offset is set by hand during a program instead of being driven by the load), set What drives the offset (LoadControl) to OB axis position and choose the OB axis in the configuration dialog (ObAxis, OB1 to OB6; ObScale = offset units per OB unit, default 1, negative inverts). The OB axis position is then the offset amount: engagement = scale × OB axis position, read from the planner every millisecond and applied along the tracked path normal, so it follows the path around corners, arcs and closed shapes exactly as the load-driven offset does, and Q1 / Q2 (G41 / G42) give its sign. Jog the OB axis +0.040 and the tool runs 0.040 to that side of the programmed path wherever it goes; jog it back to zero and the offset is gone.
| In OB-axis mode | Behaviour |
| M275 / On | Engages the offset to whatever the OB axis reads, at once but ramped through the followers (never a step). An OB axis already away from zero when the program starts gives that offset from the first feed move. |
| M276 / Off | Ramps the offset out at the retract speed and leaves the OB axis where it is; the next M275 engages it again at that value. |
| Cycle stop, tool change | Do not zero the offset in this mode. While On, the only way to remove it is to jog the OB axis to zero. |
| Direction | From feed moves, as always. Through a rapid the offset vector is held and then sweeps to the new normal at the start of the next feed move. Before the first feed move after startup there is no direction yet, so the offset ramps in at that first feed move. |
| Limits | The OB axis’s own travel limits are the engagement limits; Max engage / retract do not apply. The soft-limit clamp stays: the plugin cannot push the machine through an axis soft limit, and the At Soft Limit LED shows when the applied offset is being held short of the OB position. |
| Motion | The jog’s own velocity and acceleration shape the move; the stage only keeps it within what the motors allow, the sweep speed on corners and the smoothing window. |
| Protection | The load faults are not evaluated. The load source and target are ignored. |
| Registers | PathOffset_ObPosition is the OB position the stage sees; AchievedOffset, AppliedX/Y/Z and the average-engagement registers work as usual. |
On the diagnostics page the Load tile becomes OB axis (units) with the resulting offset, scale and axis under it, the Loop column shows which OB axis drives the offset, the graph plots the OB position in place of the load, and the Load loop tuning columncolumn, the bump, max load and min RPM fields, the Engage In / Retract Out buttons and the Tuning advisor tab are greyed out, since neithernone of them applies.
Protection and Lifecycle
A protection trip retracts the offset to zero and latches a fault (with a feed hold too when ProtectiveResponse = 1). The diagnostics status strip shows the fault with its meaning, in red, and the register PathOffset_FaultCode holds the number. All load faults are off when Load control is off (manual offsets only).
| Code | Shown as | Trips when | Turn the check off |
| 1 | fault 1: load above Max load | the filtered load is above MaxLoad while on with load control (not while retracting) |
MaxLoad = 0 |
| 2 | fault 2: spindle RPM below Min RPM | the spindle is on and its true RPM is below MinRPM |
MinRPM = 0 |
| 3 | fault 3: load signal stale (not changing) | the load reading has not changed at all for SignalTimeoutMs while cutting (Running state) with the spindle on. The timer only counts while Running and resets in every other state, so time spent off, idle or armed can never pre-charge it |
SignalTimeoutMs = 0 |
| 4 | fault 4: load reading invalid | the load source could not be read, or the value is not finite or outside 0..200 | cannot be turned off: choose a working source (LoadSource or M275 L) |
The thresholds are tuning values on the diagnostics Adaptive Path page (Direction and protection column) and registers, so a program can set them: M243 T0 (Data:"MotionFilter/PathOffset_SignalTimeoutMs") turns the stale check off. Clear a latched fault with Reset Fault on the page, the Path Offset Reset Fault command or mf.PathOffsetResetFault(); with OnReset = 0 (default) the feature stays on and the loop resumes on the next feed move, with OnReset = 1 it is off afterwards.
A cycle stop zeroes the loop offset and ends the cut. A tool change holds the offset at zero until the next feed move. Machine disable freezes the applied offset; enable adopts it without moving. Rapids and jogs while on hold the offset. The feature refuses to turn on in lathe mode or with unhomed axes. The soft-limit clamp keeps the programmed position plus the offset inside the axis soft limits by the offset's own stopping distance.
Gearing
Overview
Gearing slaves one axis motor to another at a fixed ratio. It is used where two axes must move together mechanically — for example a gantry or a linked rotary. The slave’s planner position is unaffected; only the motor output receives the extra, ratioed motion.
| M-code | Purpose |
| M34 | Gear a slave to a master. Q = master axis, S = slave axis, R = ratio (default 1). |
| M35 | Un-gear a slave from a master. Q = master axis, S = slave axis. |
(Gear Y (slave) to X (master) at 1.5:1)
M34 Q0 S1 R1.5

(Un-gear Y from X)
M35 Q0 S1
Gearing can optionally enforce the slave’s soft limits, clamping (and optionally alarming) if the master would drive the slave past its travel. See MotionFilterModule.SetGearingSoftLimits.
Lua Module Reference
MotionFilterModule (loaded as mf in the screen and M-code environments) is the scripting interface. Every function that sends a command first checks that the plugin is enabled. Functions return (success, rc, response) where response is the plugin’s reply string ("OK" on success) unless noted otherwise.
General
| Function | Purpose |
IsMotionFilterPluginEnabled() |
Returns true if the plugin is enabled in the profile. |
SendCommand(command) |
Send a raw command string to the plugin API register. |
Gearing
| Function | Purpose |
GearAxis(master, slave, ratio) |
Gear the slave to the master at ratio (negative inverts). |
UngearAxis(master, slave) |
Remove gearing. |
IsGearingActive(master, slave) |
True while the pair is geared. |
SetGearingSoftLimits(slave, enable, ramp_distance, alarm) |
Configure slave soft-limit enforcement during gearing. |
GetGearingSoftLimits(slave) |
Query the current soft-limit setting. |
IsGearingAtSoftLimit(slave) |
True while the slave is being clamped at a soft limit. |
Axis Override
| Function | Purpose |
OverrideAxis(primary, secondary) |
Copy commanded motion of the secondary axis onto the primary. |
RemoveOverrideAxis(primary, secondary) |
Remove the override. |
IsAxisOverridden(primary, secondary) |
True while the override is active. |
VerifyAxisAtZero(axis_id, message) |
Pre-check used before applying / removing an override. |
Taper Compensation
| Function | Purpose |
SetTaperComp(slave, master, ratio, pivot_mach, track_part, ramp_percent, ramp_min_s) |
Engage or update taper comp. pivot_mach is machine coordinates; track_part makes the pivot follow the part on tool changes. |
RemoveTaperComp(slave) |
Ramp the correction to zero and disengage. Idempotent. |
GetTaperComp(slave) |
Read the feedback registers: returns a table { ratio, pivot, master, applied, state }. |
IsTaperCompActive(slave) |
True while the pair is engaged (ramping or active). |
WaitForTaperCompSettled(slave, timeout_ms) |
Block until the ramp settles (ACTIVE or OFF). Used by M256 / M257. |
The state value from GetTaperComp is: 0 = off, 1 = ramping in, 2 = active, 3 = ramping out.
Adaptive Path Offset
| Function | Purpose |
PathOffsetOn(initial_engage, target_load, direction, load_source) |
Turn on; all arguments optional (nil = settings). Direction 1 = G41 (offset right of travel) / 2 = G42 (offset left) in X/Y, 3 Z down / 4 Z up; load source 1 spindle, 2 register, 3 Z axis, 4 X/Y axes. |
PathOffsetOff() |
Ramp the offset to zero. |
PathOffsetWaitForZero(timeout_s) |
Block until the offset is off (after PathOffsetOff). |
PathOffsetEngageIn(distance) / PathOffsetRetractOut(distance) |
Immediate bump toward / away from the part (nil = ManualIncrement). |
PathOffsetSetTarget(pct) / PathOffsetSetSide(side) |
Change the target load / the side while on. |
PathOffsetGetAverageEngagement() |
Average achieved engagement of the last completed cut. |
PathOffsetGetAchieved() / PathOffsetIsOn() |
Current achieved offset / on state. |
PathOffsetSetParam(key, value) / PathOffsetGetSetting(key) |
Write / read a setting register (applies immediately, persisted). |
PathOffsetSetLoadInput(value) / PathOffsetGetLoadInput() |
External load feedback register (load source 2). |
PathOffsetResetFault() / PathOffsetReloadSettings() / PathOffsetQuery() |
Clear a fault / reload motor limits / read a status table. |
PathOffsetAnalyze() / PathOffsetApplySuggestion(t) / PathOffsetClearTuneData() |
Tuning advisor: analyse the recorded cut data into a table (gain, delay, noise, oscillation, suggested Kp / Ki / Kd / filter / tolerance / rate, notes) / write a suggestion to the tuning settings / forget the recorded data. |
Squaring
| Function | Purpose |
SetSquaringAngle(angled_axis, following_axis, degrees) |
Set the out-of-square angle and the axis that compensates. |
LockSquaring(enable, adjust_units) |
Activate squaring (all angles must be set first). |
UnlockSquaring() |
Release squaring. |
Logging
| Function | Purpose |
EnableLogging(enable) / DisableLogging() |
Turn position logging on or off. |
LogAxis(axis) |
Enable detailed logging for one axis. |
QuickLog(axis) / QuickLogAll() |
Capture a brief position snapshot for one or all axes. |
Command Protocol
Scripts talk to the plugin by sending semicolon-delimited command strings to the MotionFilter/API register via mc.mcRegSendCommand() (wrapped by MotionFilterModule.SendCommand). The command surface:
| Command string | Lua wrapper |
lock axis gearing;{slave};{master};{ratio} |
GearAxis |
unlock axis gearing;{slave};{master} |
UngearAxis |
set gearing soft limits;{slave};{0|1} |
SetGearingSoftLimits |
override axis;{primary};{secondary} |
OverrideAxis |
remove override axis;{primary};{secondary} |
RemoveOverrideAxis |
taper comp;{slave};{master};{ratio};{pivot};{track};{ramp%};{ramp_min_s} |
SetTaperComp |
remove taper comp;{slave} |
RemoveTaperComp |
get taper comp;{slave} |
GetTaperComp (reads registers) |
set squaring angle;{angled};{following};{degrees} |
SetSquaringAngle |
lock squaring;{enable};{adjust_units} / unlock squaring |
LockSquaring / UnlockSquaring |
enable logging;{0|1} / disable logging |
EnableLogging / DisableLogging |
open diagnostics / close diagnostics |
— |
path offset on;{initial_engage};{target_pct};{side} |
PathOffsetOn |
path offset off |
PathOffsetOff |
path offset engage in;{distance} / path offset retract out;{distance} |
PathOffsetEngageIn / PathOffsetRetractOut |
path offset set target;{pct} / path offset set side;{1|2} |
PathOffsetSetTarget / PathOffsetSetSide |
path offset set param;{key};{value} / path offset reload settings |
PathOffsetSetParam / PathOffsetReloadSettings |
path offset reset fault / path offset query |
PathOffsetResetFault / PathOffsetQuery |
Diagnostics Window
The plugin’s diagnostics window (opened with the open diagnostics command) has a tab per filter family — Gearing Filters, Squaring Compensation, Rotation Filters, and Taper Comp. Each shows live per-axis state. The Taper Comp tab lists one row per slave axis with an Active LED and read-only Ratio, Pivot, and Applied columns, so you can confirm the correction the plugin is actually applying independently of the screen dialog.
If the adjust dialog and the diagnostics window disagree on the applied correction, the diagnostics window is authoritative — it reads the plugin’s live state directly.
Components
| File | Purpose |
Plugins/MotionFilter/MotionFilter.cpp |
Plugin entry point, message handling, command dispatch, push/pop orchestration. |
Plugins/MotionFilter/RatioFilter.cpp |
Gearing filter implementation. |
Plugins/MotionFilter/AxisOverride.cpp |
Axis override filter implementation. |
Plugins/MotionFilter/TaperComp.cpp |
Taper compensation filter implementation. |
Modules/MotionFilterModule.lua |
Lua scripting interface (mf). |
Modules/CommonMCodeModule.lua |
Hosts _m34, _m35, _m256, _m257 implementations. |
Profiles/<profile>/Macros/m256.mcs, m257.mcs |
G-code macro wrappers for taper comp. |
Profiles/<profile>/Settings/Standard/Common/settings.TaperComp.csv |
Taper Comp OEM parameter definitions. |