How to Update HiCON Firmware
The Following directions will help you properly update the firmware of the HiCon on an Apollo 3.
If you are upgrading the Mach4 software, the appropriate firmware will be placed on the hard drive when you do the upgrade. I'll tell you where it was placed later in the story. Keep Reading.
*Mach must be closed before performing this operation*
1. Find and open the VSI Device Manager, it may have a shortcut on the desktop or in the MachMotion Programs and Drivers folder which should also have a shortcut on the desktop. In the worst case, reinstall it from C:\Mach4\MotionControllers\Apollo III\VSI_Device_Manager
2. Once you have opened the VSI Device Manager you will be presented with this screen.
3. Now Click the Scan Network button, this will display all the info on the HiCon board. Be sure to pay particular attention to the Hardware version, if it is anything less than 7752 you will not be able to update the firmware on the HiCon to the current version without replacing the HiCon.

4. Highlight the HiCon info by Left clicking on it and then click the Switch To Loader button as displayed below.

5. A warning will pop up letting you know you are about to switch to upgrade mode, click OK if you wish to proceed.

6. Once in upgrade mode click on Load File, it will ask you for the location of the new firmware. Navigate to the location of the new file
- It will be hamed HICONfw-n.nn.bin
- If VSI sent it to you, then get it from your downloads folder, or wherever you placed it.
- Mach4 installer places it in C:\Mach4\MotionControllers\Apollo III\
-
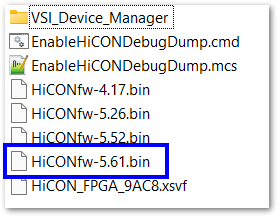

7. Click on the newest file to load it. There may be occasions when you do not want to use the latest FW, and that would typically be at DEV's discretion.
7. With the file loaded click Program Flash. You should get a warning to make sure you do not lose power when programming. Click OK to continue and wait for it to finish. Once finished if you have done everything right you should get a message saying that you succeeded and to reboot the HiCon.
8. When it finishes rebooting close out of the VSI Device Manager and then open it back up, click Scan Network and look at version number under the Firmware tab to verify that it has changed. You can also click on Switch To Loader and then click Verify Flash to make sure it actually programmed properly. If the correct version number still doesn't display properly, disconnect the power from the Apollo 3 for 30 seconds and then reconnect the power.
10. You may need to use the same procedure to upgrade the FPGA. You would load the FPGA file that you are upgrading to, then click the FPGA Fast Prog.